Step-by-Step Guide: Integrating AWS Lambda with S3 and API Gateway for Event-driven Architecture
🌩️ Introduction
🚀 In the fast-paced world of modern application development, integrating AWS Lambda, S3, and API Gateway is a game-changer! This powerful trio enables event-driven processing 🔄, automating actions based on real-time events. The benefits? Unparalleled efficiency, scalability, and seamless integration for your applications. Say goodbye to server management 👋 and hello to a dynamic, cost-efficient, and responsive architecture. Welcome to the future of development with AWS! 🌐
⚡ The Power of Event-Driven Architecture
🚀 With technology advancing at lightning speed, finding the right blueprint for your applications can be a game-changer. 💡 One such architectural pattern that has gained significant momentum is Event-Driven Architecture (EDA). At its core, EDA is a software development method for building applications that asynchronously communicate or integrate with other applications and systems via events. 🌐💻
Let's dive into the battle of the architectures and witness Event-Driven Architecture (EDA) rise above the traditional synchronous approach! 👀
💡 The EDA Advantage: Real-World Examples 💡
In a traditional synchronous email system, when you press the "Send" button, the email is immediately sent out 🚀. However, since the system handles your request in real-time, any delays or problems (like Network Congestion, a large number of users sending emails at the same time, unstable internet connection) that occur can make you wait for a response, which can seriously impact your productivity 😕.
But imagine an asynchronous email system - an event-driven approach 😍. When you click "Send," the system acknowledges your request and adds the email to a processing queue 📥. You can carry on with other tasks while the email is being handled in the background 👩💻. Once the system successfully delivers the email, you receive a notification 📬, allowing you to stay productive without any interruptions 🤓.
🧠 Understanding AWS Lambda, S3, and API Gateway
👋 Welcome to the world of AWS services! Let's explore the exciting world of serverless computing and cloud-based storage. 🚀
🔧 AWS Lambda: AWS Lambda 🤖 is a serverless computing service that lets you run code without managing servers. It automatically scales ⚖️ to handle incoming requests, so you can focus on your code without worrying about infrastructure! With Lambda, you only pay for the compute time ⏱️ your code consumes, making it cost-effective 💰 and efficient for event-driven applications! 🎉
🗄️ AWS S3: AWS S3 🌧️ is a cloud-based storage service by Amazon 🛍️. It offers highly scalable 📈 and durable storage, so you can store and retrieve data securely. S3 also provides strong security features 🔒 to keep your data safe from unauthorized access!
🚪 AWS API Gateway: AWS API Gateway 🚪 is a fully managed service that acts as a front door for your serverless backend or existing web services. It enables you to create, deploy, and manage APIs with ease! You can customize 🎨 your APIs, ensure security 🔐, monitor 📊 their performance and scale them to meet your application's demands 📈. It's like having a friendly gatekeeper for your APIs! 😎
Let's use a real-world analogy to explain this event-driven processing with AWS Lambda, S3, and API Gateway: 🚀
Imagine you run a popular online store selling various products. You use AWS services to handle different aspects of your business. 🏢
🏬 AWS S3 - The Warehouse:
Think of AWS S3 as a massive warehouse where you store all your products (🖼️ images, 📝 descriptions, 💲prices, etc.). Whenever you add a new product or update information about an existing product, it's like putting items in or changing items in the warehouse.🔄
👥 AWS Lambda - The Store Assistants:
AWS Lambda functions 🤖 are like store assistants who are always ready to take action. Each assistant specializes in a specific task, such as updating product prices 💰, sending email notifications ✉️, or processing orders 🛒.
🏢 AWS API Gateway - The Customer Service Desk:
The API Gateway is like a customer service desk at the entrance of your store. It handles customer requests 🙋 and guides them to the right store assistant (Lambda function) based on what they need.🎯
🛍️ Now, Let's see how this event-driven setup works when a customer interacts with your online store.
Scenario: Customer Places an Order
👤 Customer: A customer places an order on your website! 🛒
🏢 AWS API Gateway - The Customer Service Desk: The customer service desk (AWS API Gateway) receives the order request! 💌
🚪 API Gateway: "Hello there, dear customer! 🙋♀️ Let me guide your order to the right store assistant!"
🤖 AWS Lambda - The Store Assistant: The store assistant (AWS Lambda function) responsible for processing orders gets the request! 🛠️
Store Assistant: "Order received! Let's get to work! 🛠️💨"
Store Assistant: The store assistant verifies the order details to ensure everything is correct. ✔️
Store Assistant: "Checking order details... ✔️
Store Assistant: Then, it updates the inventory to account for the ordered items. 📝
Store Assistant: "Inventory updated! 📝"
Store Assistant: Next, it processes the payment securely and efficiently. 💰
Store Assistant: "Payment processed! 💳"
Store Assistant: Lastly, it sends a confirmation email to the customer to keep them informed. 📨
Store Assistant: "Confirmation email sent! ✉️ Thank you for your order!"
Congratulations!🎉 The customer's order has been successfully processed.
📂 Integrating Lambda with S3
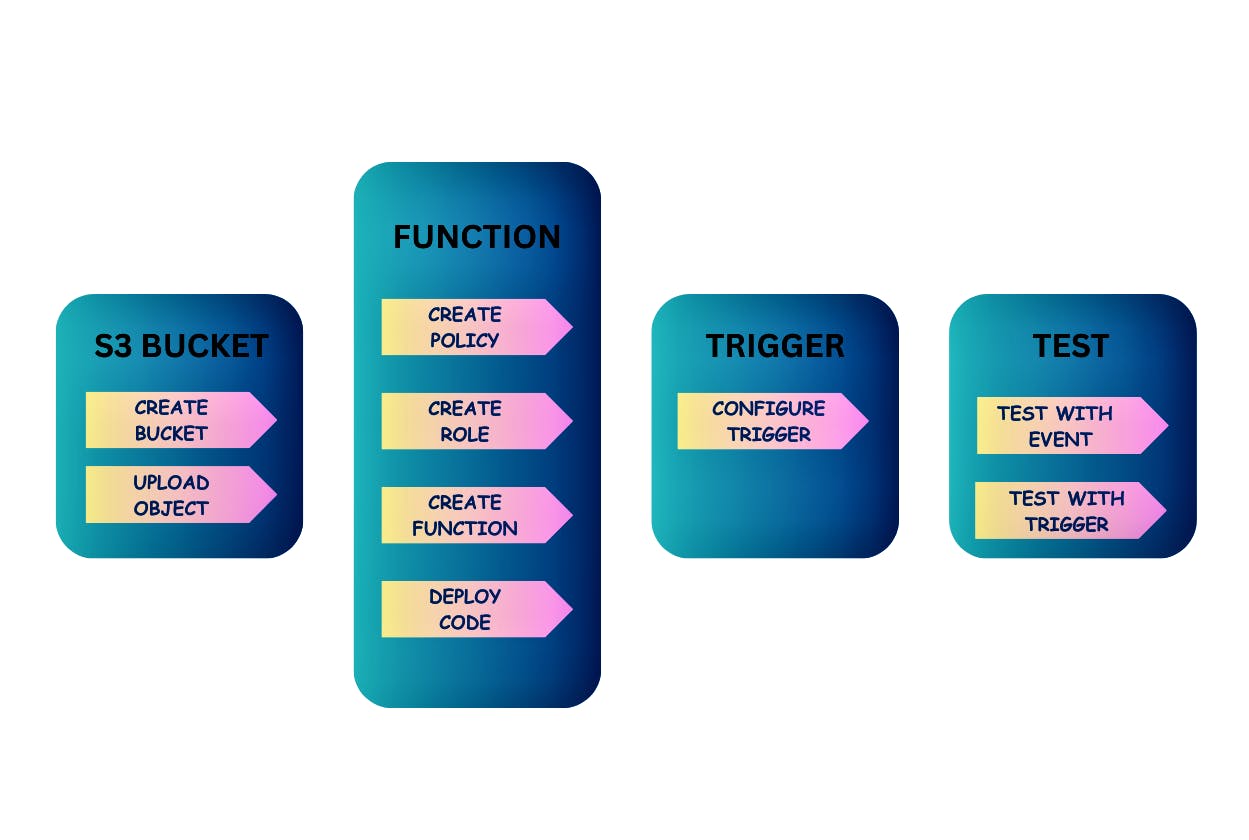
Create an S3 bucket and upload an object.
Open the Amazon S3 console and select the Buckets page.
Choose Create bucket.
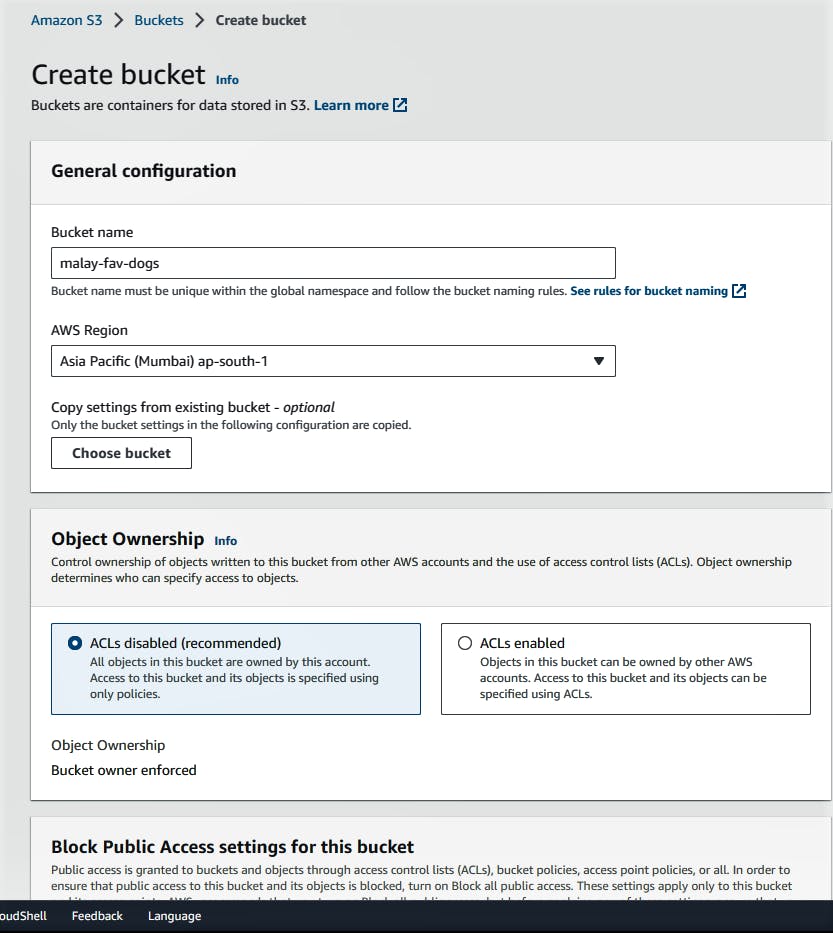
Opt Enable all public access. (Not mandatory)
Enable Bucket Versioning. (Not mandatory)
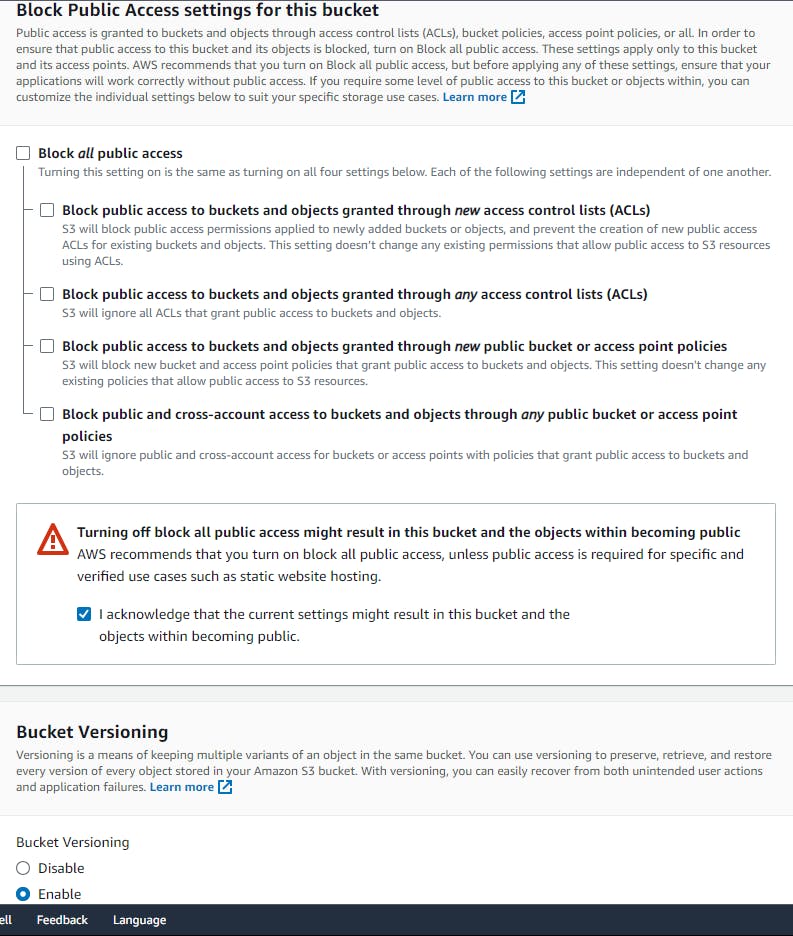
Leave all other options set to their default values and choose Create bucket.

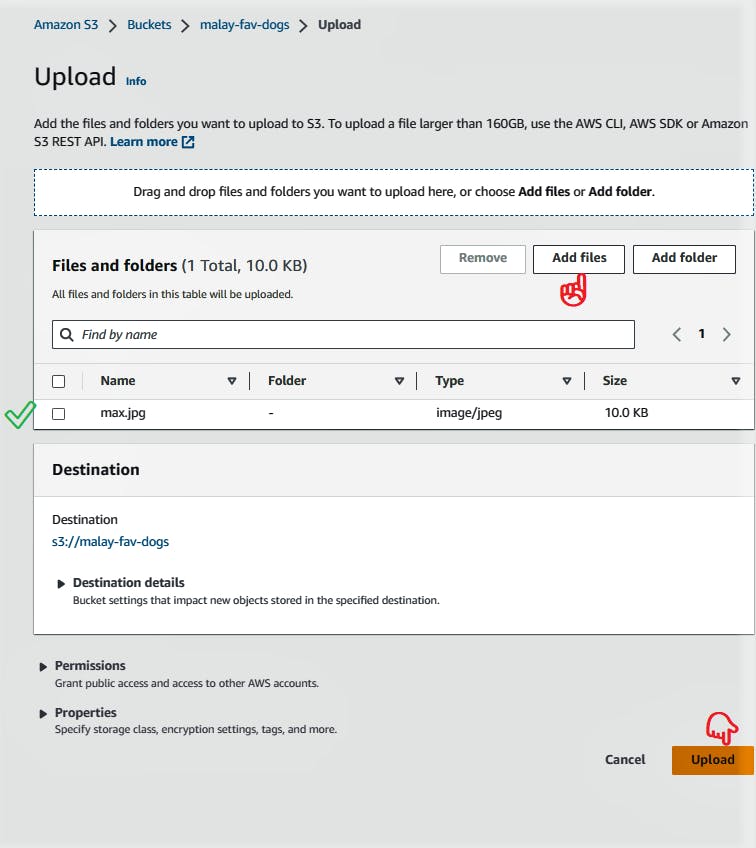
Open the Buckets page of the Amazon S3 console and choose the bucket you created during the previous step.
Choose Upload.
Choose Add files and use the file selector to choose the object you want to upload.
Choose Open, then choose Upload.
Create Lambda Function:
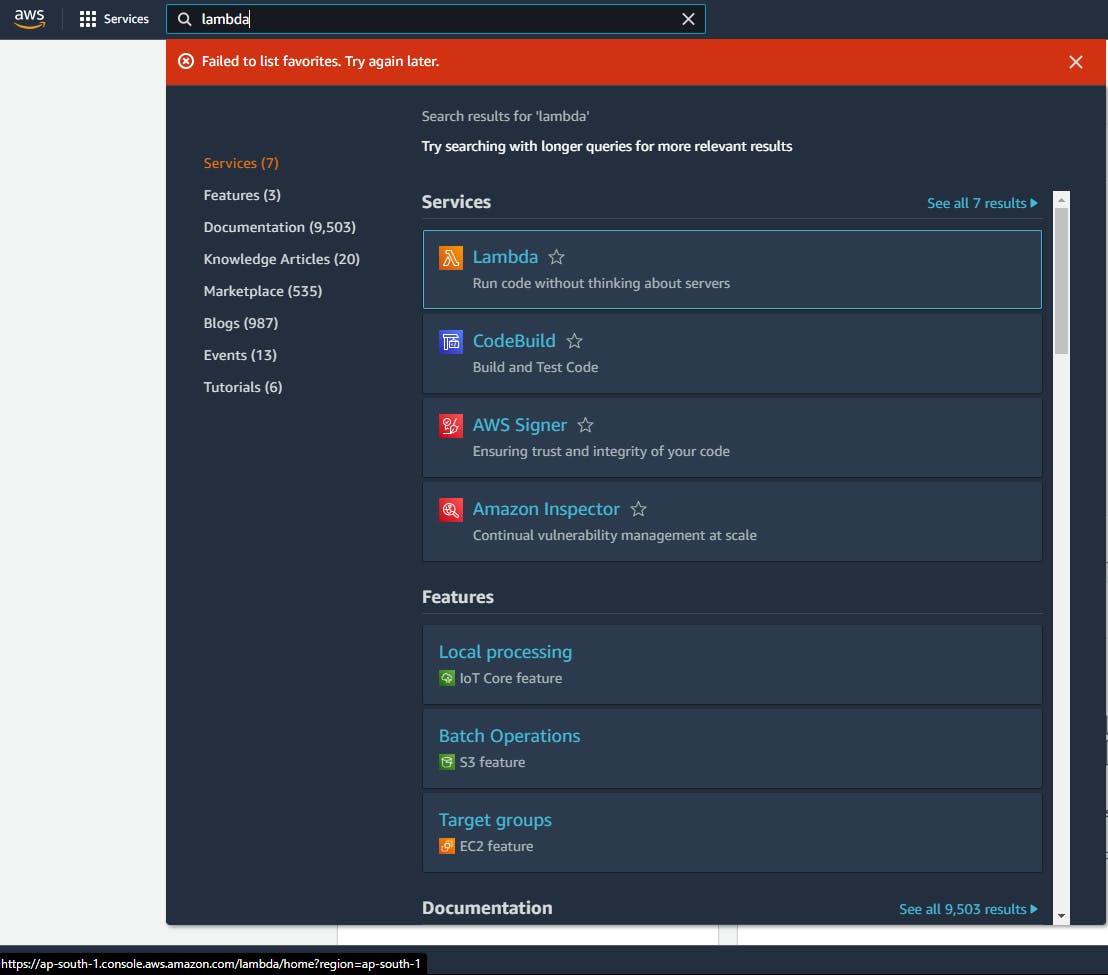
👉 Go to the AWS Management Console and navigate to the AWS Lambda service.
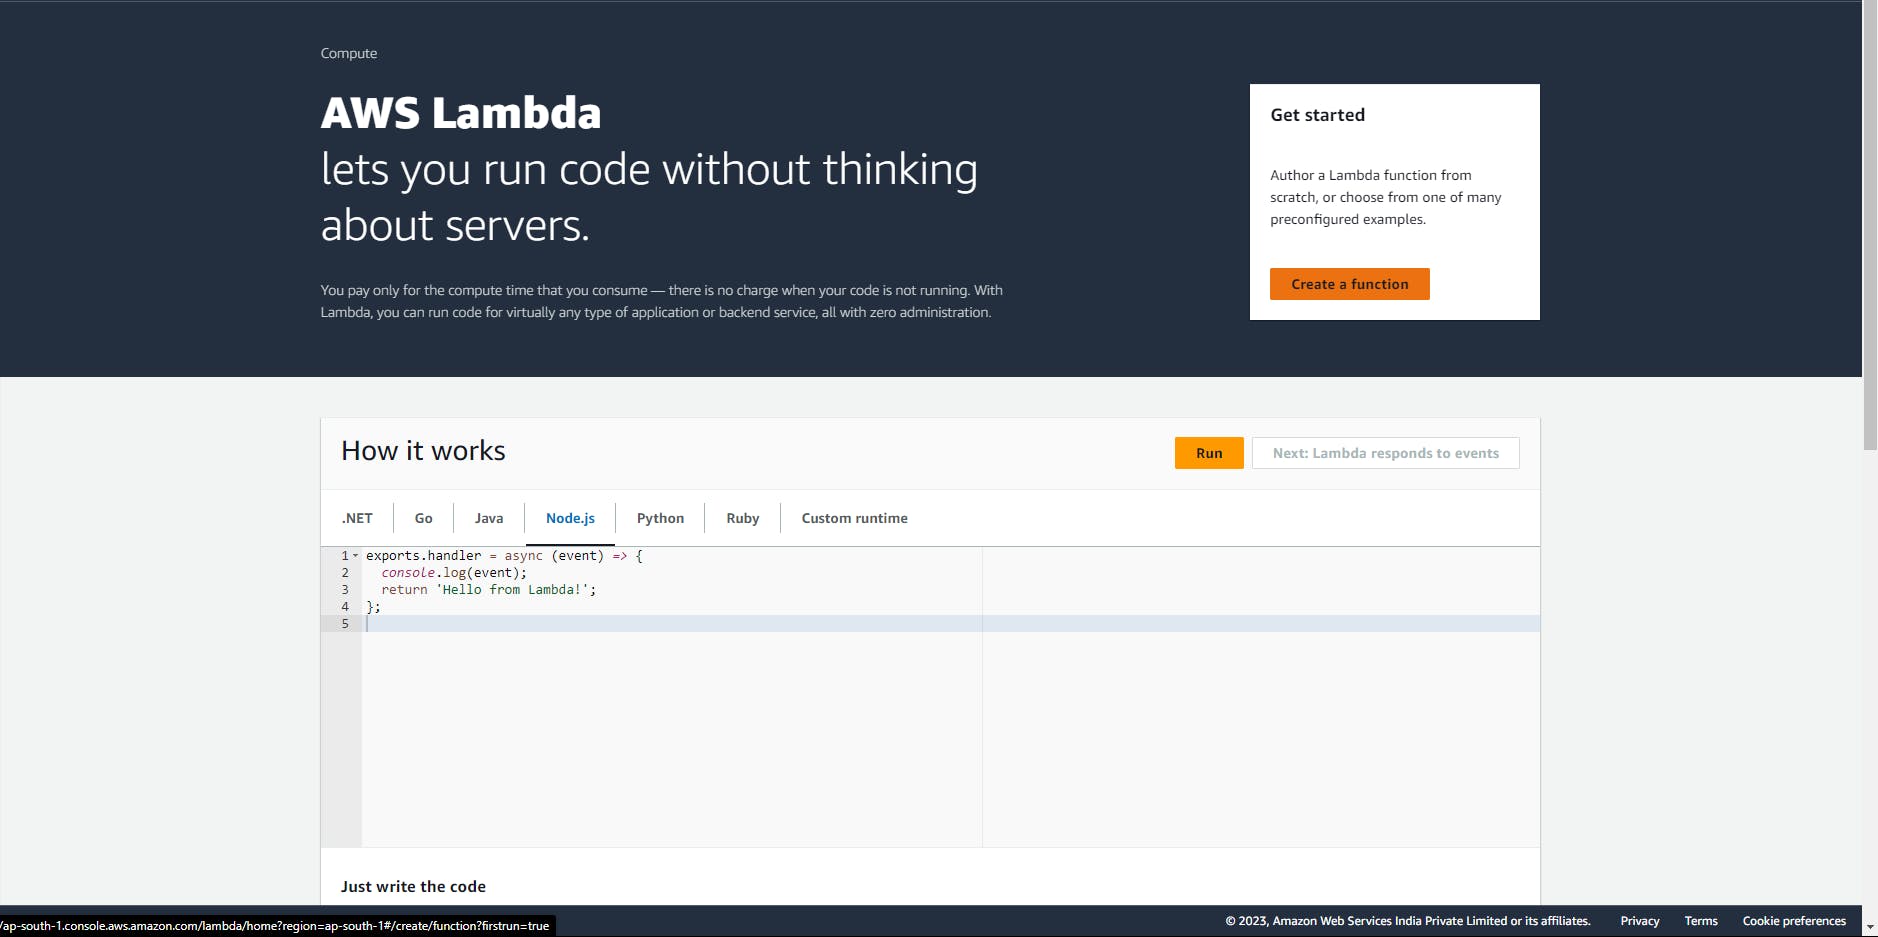
👆 Click on the "Create function" button.
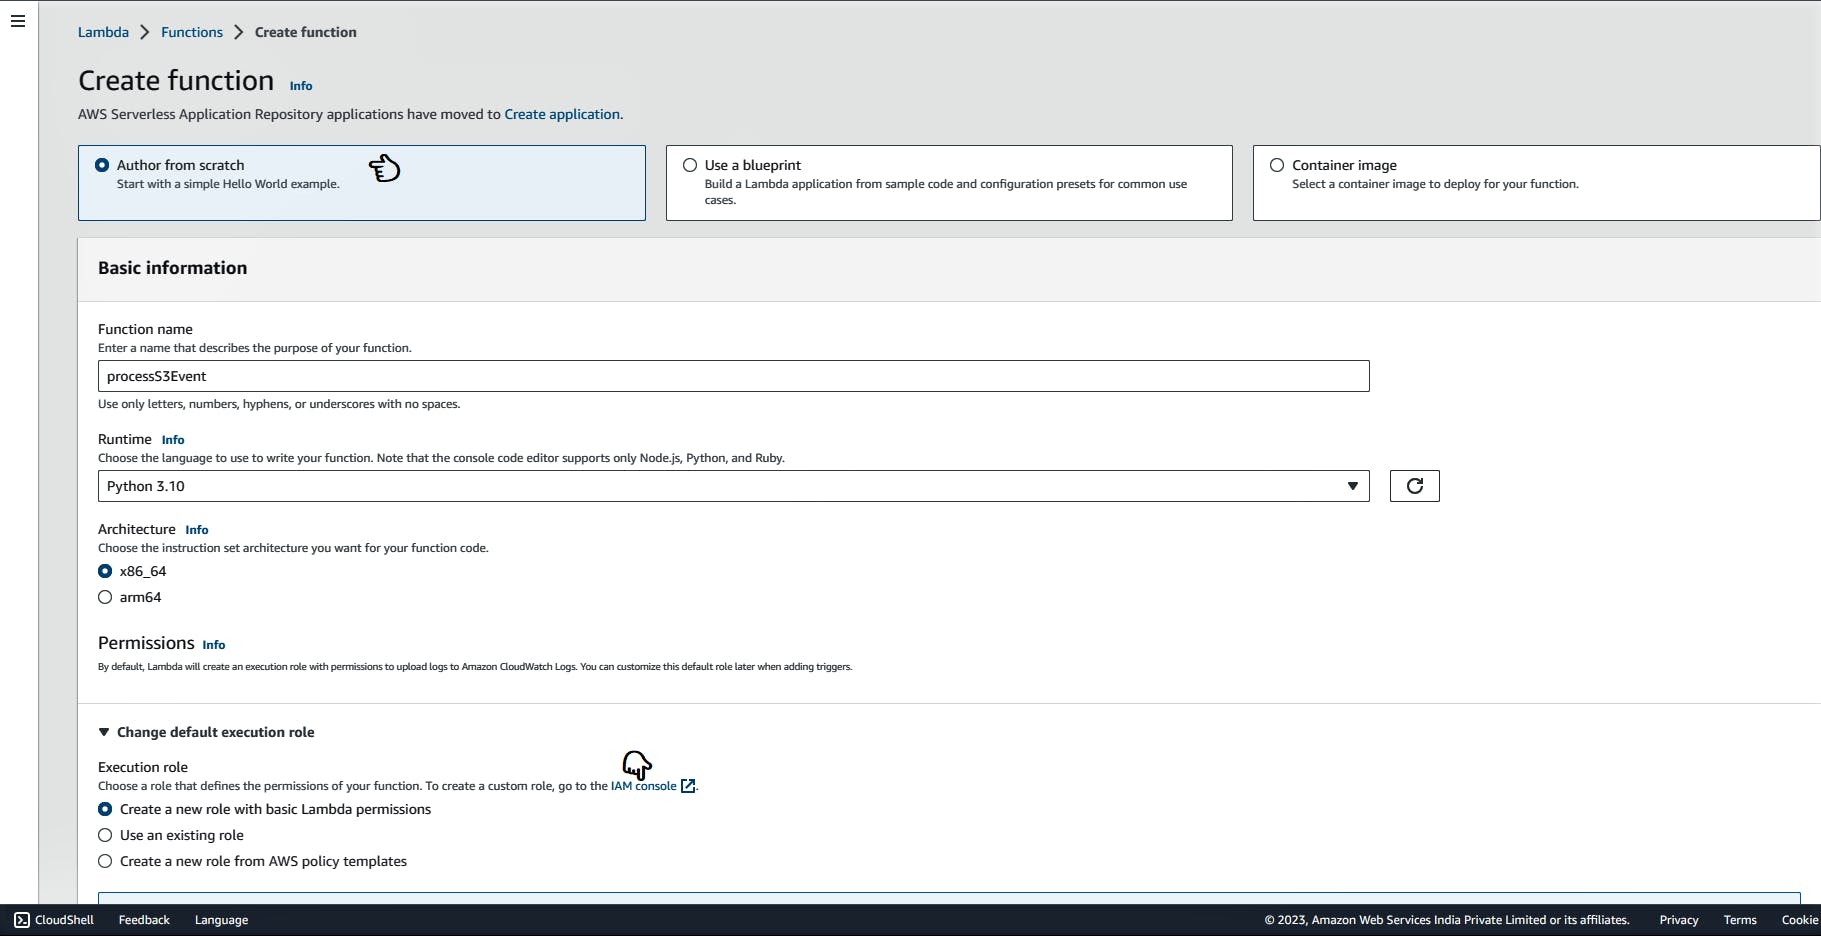
📝 Choose the "Author from scratch" option.
💡 Provide a name for your function.
⚙️ Select the runtime environment (e.g., Python).
🔧 Under "change default execution role" click on IAM console.
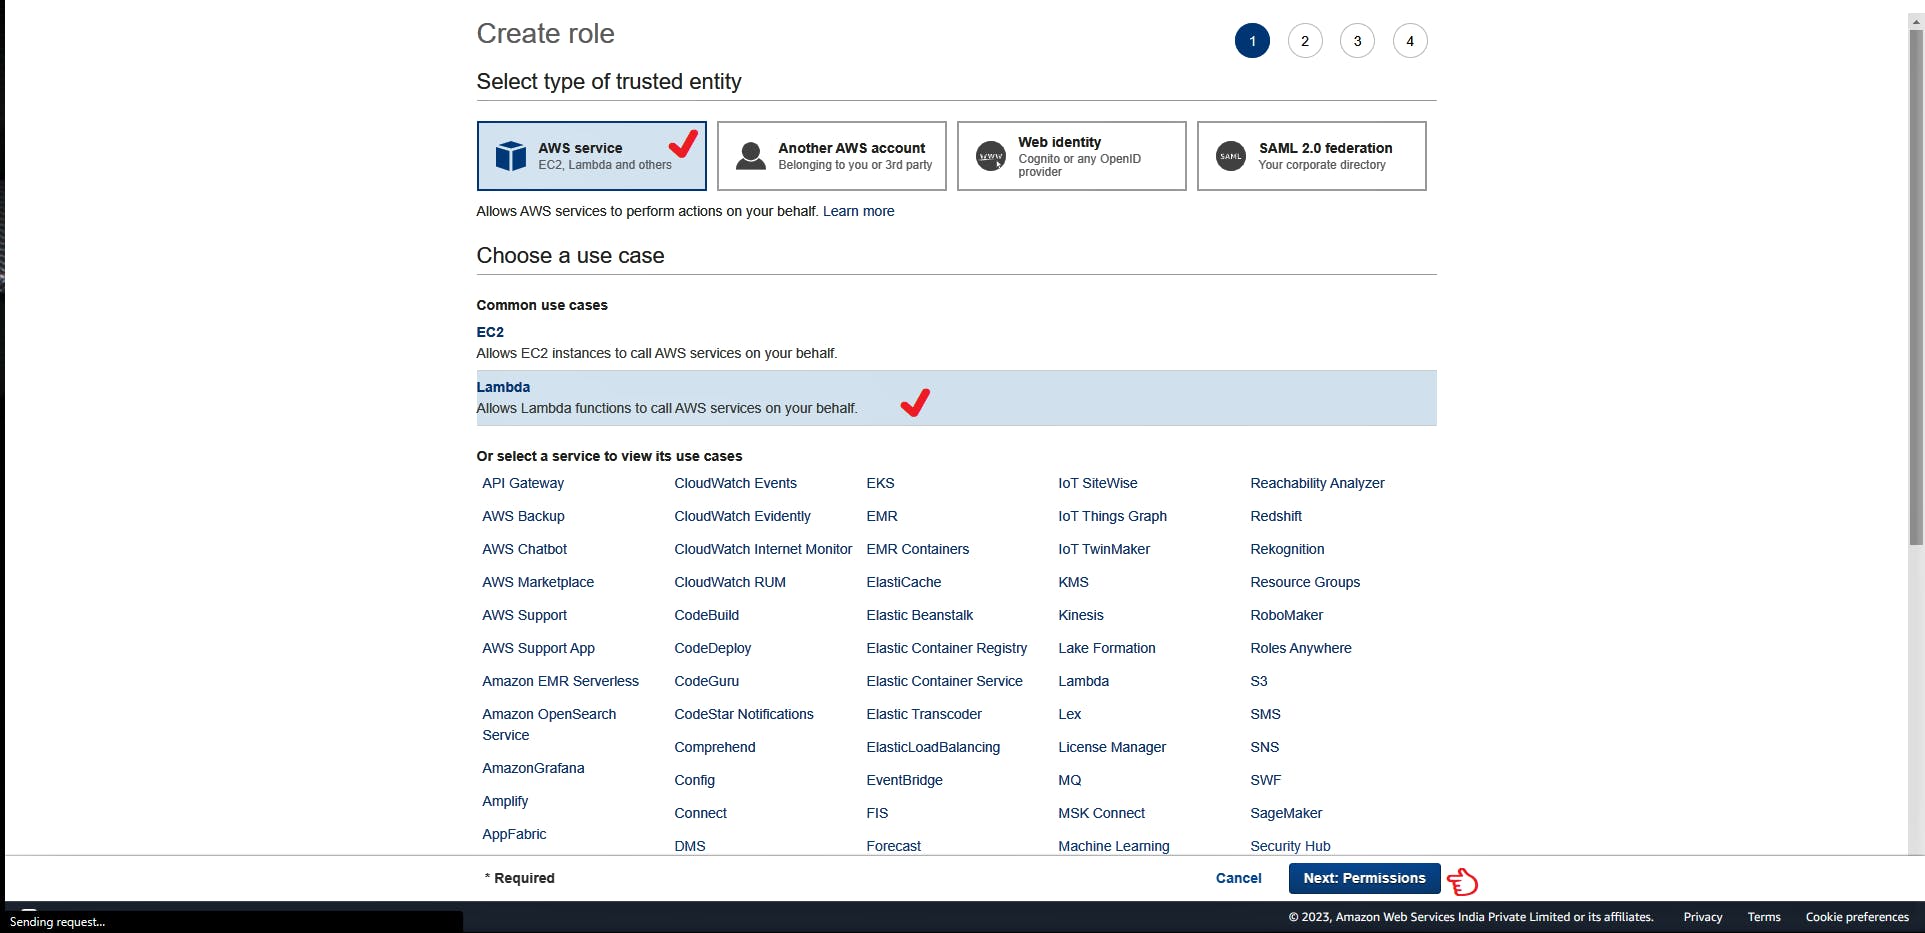
📦 Choose AWS Service and Lambda. Then click on Next: Permission.
🔍 Search and Select
AmazonS3FullAccess,CloudWatchFullAccessandAWSLambdaBasicExecutionRole. Then click on Next: Tags.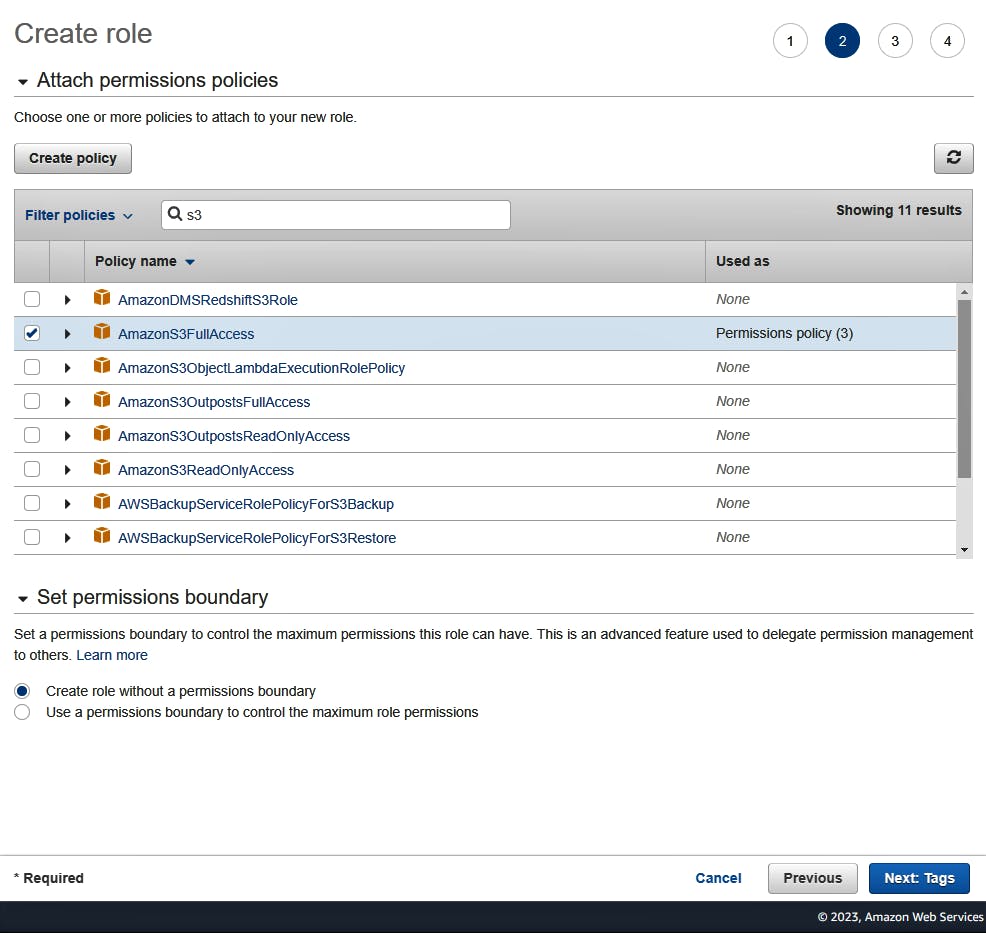
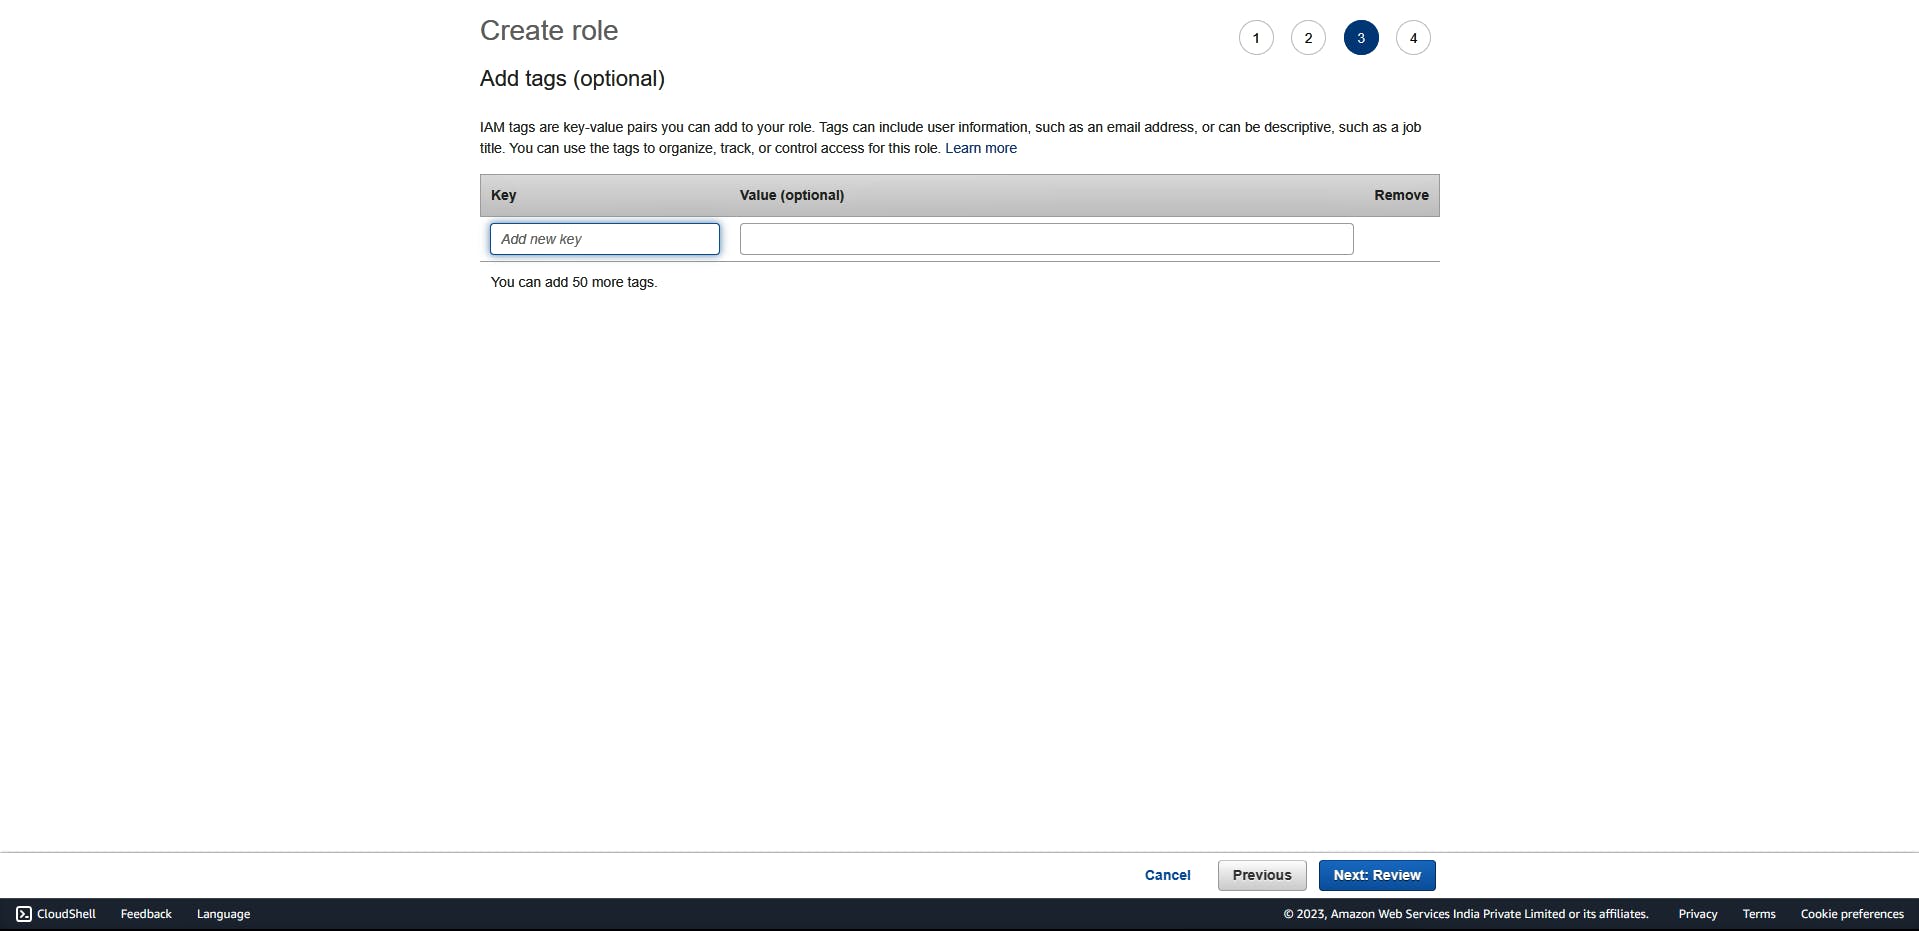
✅ Leave blank for now, Click Next: Review.
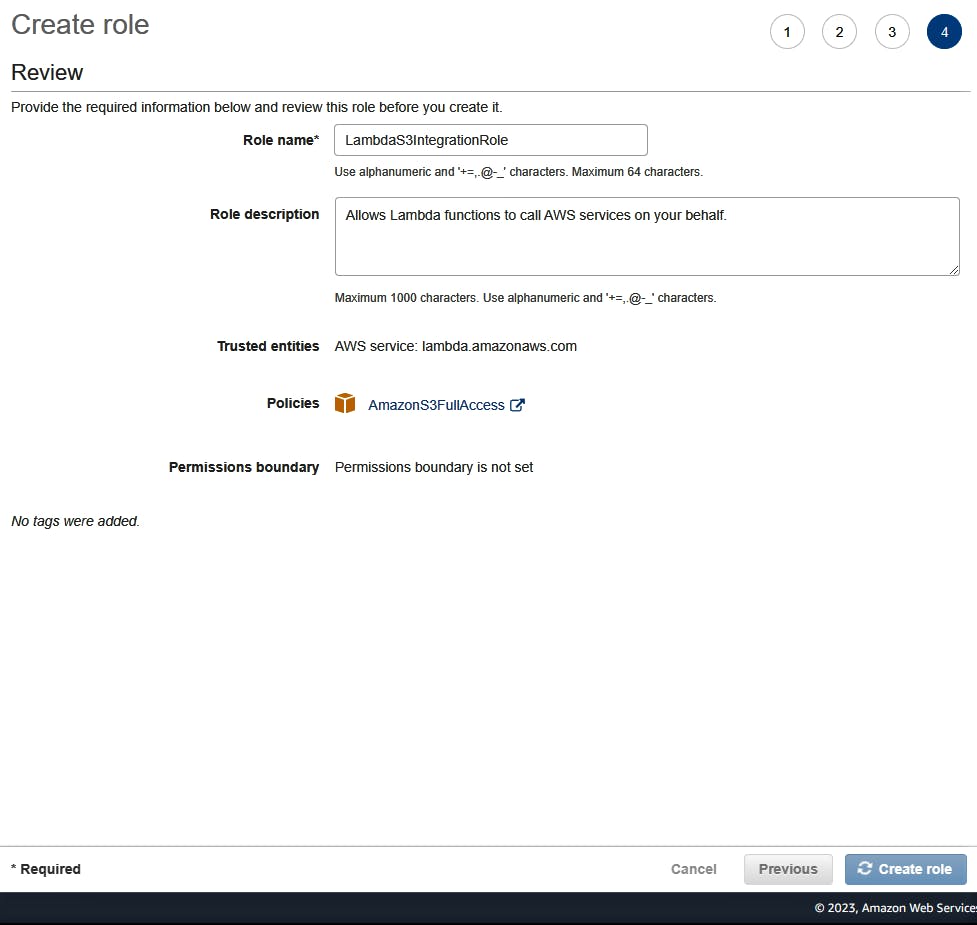
✍🏼 Provide a role name for your Lambda function, Click on "Create role".
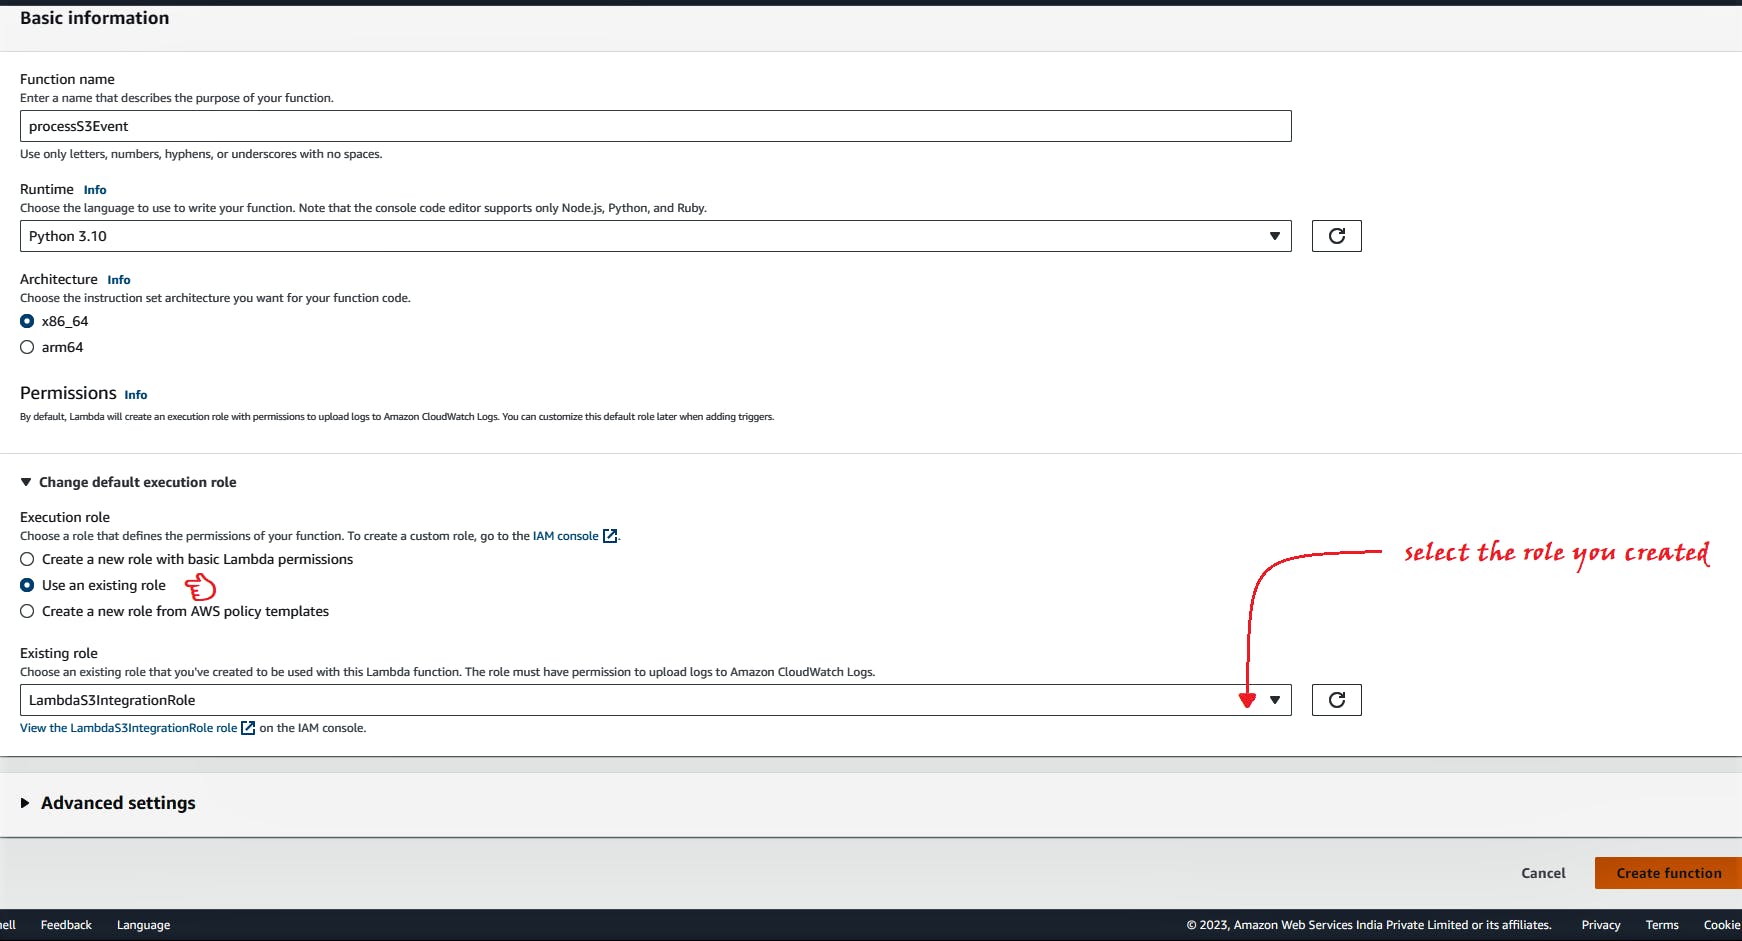
Return to Lambda > Functions > Create function. Under "Change default execution role" opt ⏺️ Use an existing role. Select the role you created in step 10, Click on Create function.
Deploy the function code:
Open the function page of the Lambda console.
Choose the function you created in the previous step (
processS3Event).
Choose the Code tab.
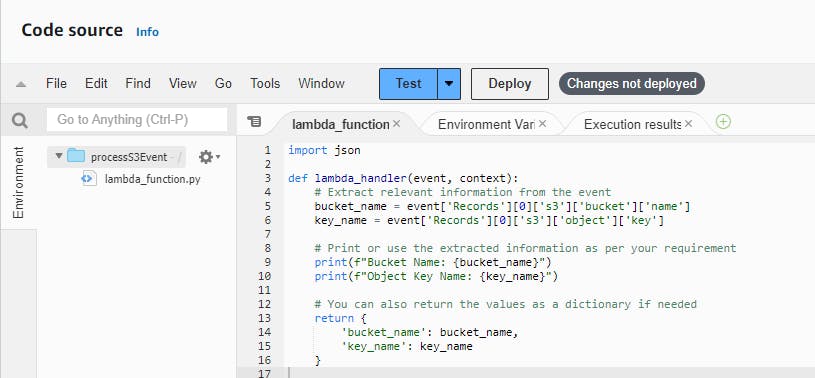
Copy and paste the Python code given below.
 import json

 def lambda_handler(event, context):
     # Extract relevant information from the event
     bucket_name = event['Records'][0]['s3']['bucket']['name']
     key_name = event['Records'][0]['s3']['object']['key']

     # Print or use the extracted information as per your requirement
     print(f"Bucket Name: {bucket_name}")
     print(f"Object Key Name: {key_name}")

     # You can also return the values as a dictionary if needed
     return {
         'bucket_name': bucket_name,
         'key_name': key_name
     }
Choose Deploy.
Configure the Trigger (S3 Bucket):
After creating the Lambda function, go to the "Designer" section of your Lambda function page.
Click on "Add trigger."
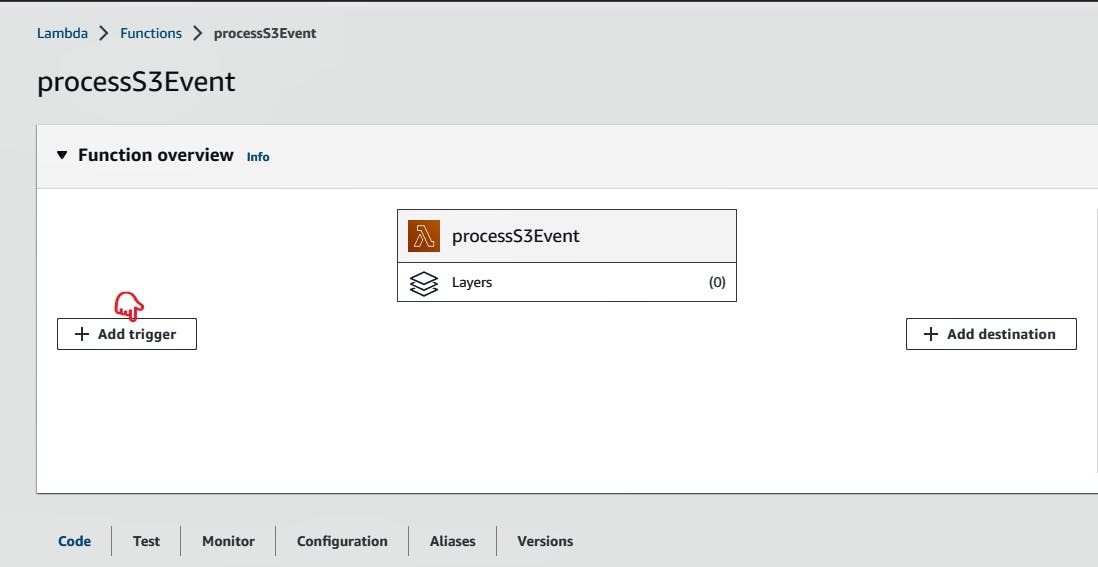
Search for and select "S3" as the trigger source.

Under Bucket, select the bucket you created earlier in the tutorial.
Under the event type(e.g., "All object create events").
Click on "Add" to add the trigger to your Lambda function.

Testing the Lambda function with a dummy event:
In the Lambda console page for your function, choose the Code tab.
In the "Test" dropdown, select "Configure test event."

In the Configure test event box, do the following:
For Event name, enter
TestingS3Event.
For Template, choose S3 Put.
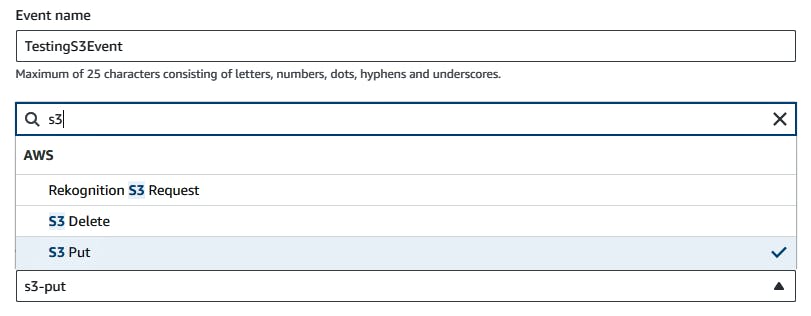
In the Event JSON, replace the following values:
Replace
us-east-1with the region you created your Amazon S3 bucket in.Replace both instances of
example-bucketwith the name of your own Amazon S3 bucket.Replace
test%2FKeywith the name of the test object you uploaded to your bucket earlier (for example,bulldog.jpg).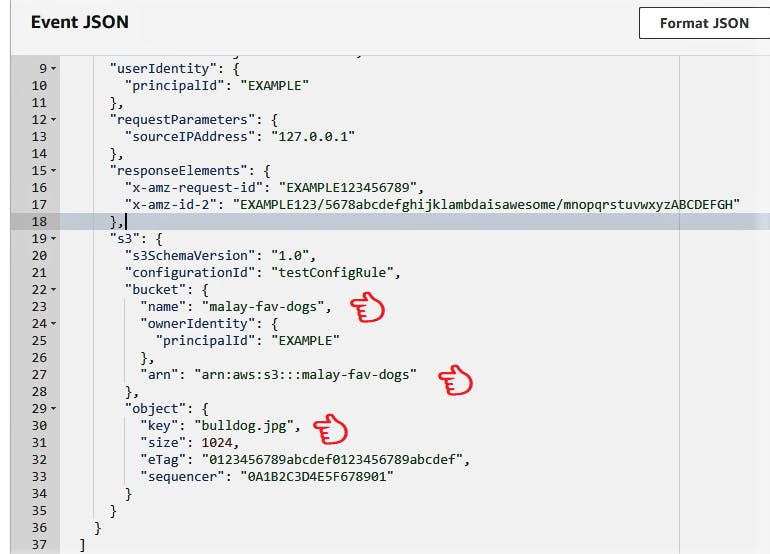
In the Code source pane, choose Test.
If your function runs successfully, you’ll see output similar to the following in the Execution results tab.

Test with Triggers:
upload an object to your Amazon S3 bucket.
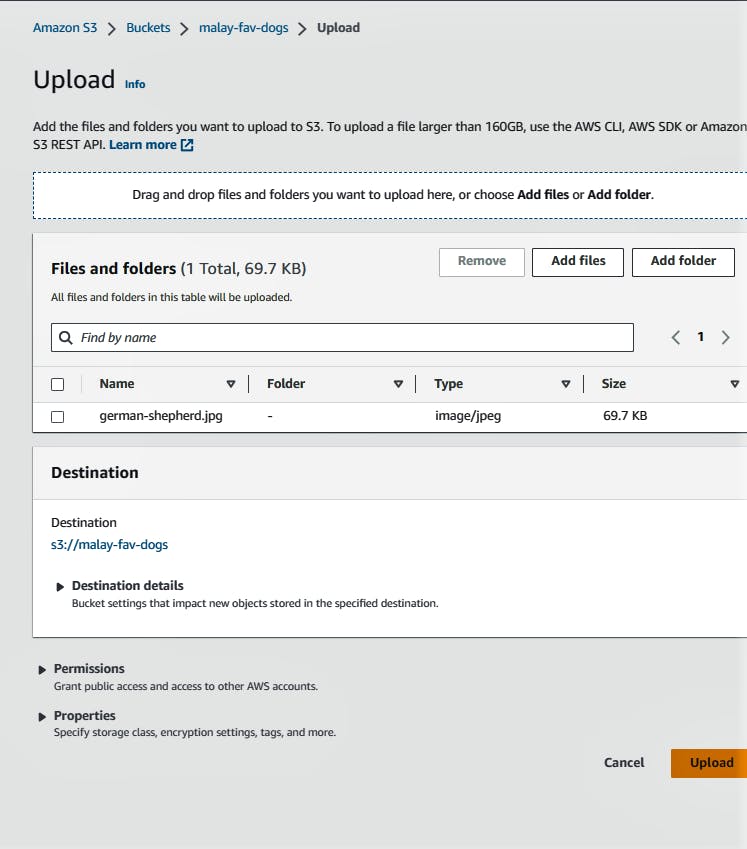
Verify Correct Operation using CloudWatch Logs
Open the CloudWatch console.
Choose Logs, then choose Log groups.
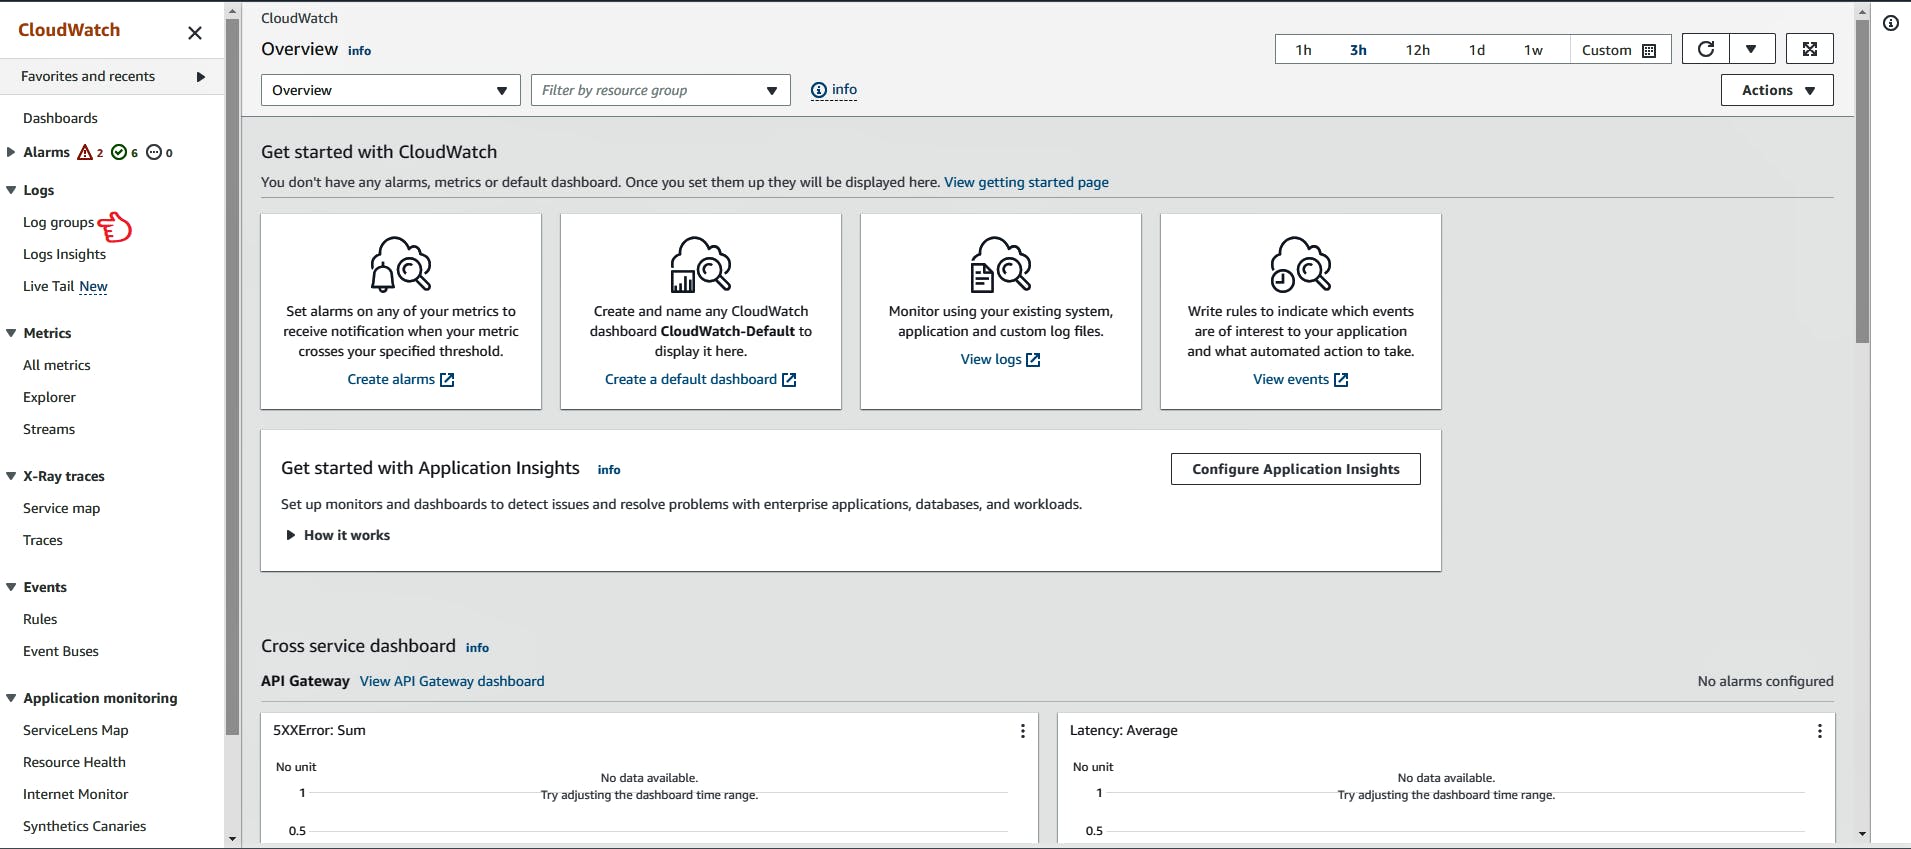
Choose the log group for your function(s3ProcessEvent)

Under Log Streams, click on Search all log streams.

In the Log Event pane, Click on 30m. (to see the most recent event logs that happened in the last half hour)

If your function has been invoked correctly in response to your Amazon S3 trigger, you’ll see an output similar to the following:
2023-07-27T16:57:16.364+05:30 Bucket Name: malay-fav-dogs2023-07-27T16:57:16.364+05:30 Object Key Name: german-shepherd.jpg
📲 A basic introduction to REST API:
WHAT IS REST API?
REST API stands for Representational State Transfer Application Programming Interface.
REST API is not a rigid protocol or standard with strict rules; instead, it provides a set of guiding principles that developers can follow while designing their APIs.
REST API is based on architectural principles that define how different components of an application should interact with each other
REST API is specifically focused on designing web-based applications where different software systems or services interact over the internet or an intranet. It is a style of designing APIs for distributed systems, allowing different applications to communicate and exchange data seamlessly.
REST is an architectural style that uses HTTP as its communication protocol and is widely used in modern web development to build scalable and efficient web services.
Key concepts in REST API:
Resources: In a REST API, resources are like building blocks that represent different things you can interact with on the internet. They can be tangible things like users, products, or articles, or they can be abstract concepts like collections or search results. Each resource has its unique address called a URI (Uniform Resource Identifier) that helps identify and access it over the web. With REST APIs, you can perform actions on these resources, like getting information about them or updating them, by using standard web methods like clicking links in a web browser.
URLs (Uniform Resource Locators): URLs are a specific type of URI that provide the address or location of a resource on the web. In RESTful APIs, URLs are used to uniquely identify and access resources. For example:
https://api.example.com/usershttps://api.example.com/products/123HTTPS (Hypertext Transfer Protocol Secure): HTTPS is the secure version of HTTP, the protocol used for communication between clients (e.g., web browsers, mobile apps) and servers. REST APIs often use HTTPS to encrypt and secure data transmitted over the internet, ensuring data privacy and protection against eavesdropping and tampering.
Stateless: A stateless request means that the client must include all the necessary information in the request itself so that the server can understand and process the order without relying on any previous interactions or client-specific states.
 POST /api/orders HTTP/1.1
 Host: example-bookstore-api.com
 Content-Type: application/json

 {
   "book_id": "12345",
   "quantity": 2,
   "shipping_address": "123 Main St, City, Country",
   "payment_method": "credit_card",
   "credit_card_info": {
     "card_number": "**** **** **** 1234",
     "expiry_date": "08/25",
     "cvv": "123"
   }
 }
In this example, the client wants to place an order for a book with ID "12345" and requests two copies to be shipped to the address "123 Main St, City, Country." The client also specifies the payment method as "credit_card" and provides the credit card information for payment.
The entire information needed to process the order is included in the request payload. The server doesn't need to have any previous knowledge about the client or their past interactions. It can handle the request independently, using the provided information to process the order, charge the credit card, and respond with the appropriate result.
Representation: In RESTful APIs, resources are represented in a specific format, such as JSON (JavaScript Object Notation) or XML (Extensible Markup Language). Representations are the data exchanged between clients and servers during API interactions. When a client requests a resource, the server responds with the representation of that resource in the chosen format. For example, a client might send a request to get a user's data, and the server responds with a JSON object representing that user.
Consider a simple RESTful API for managing user data. The API has an endpoint to retrieve information about a specific user.
 GET /api/users/123 HTTP/1.1
 Host: example-api.com
 Accept: application/json
In this example, the client sends a GET request to the server, requesting information about the user with ID "123". The client specifies in the request headers that it can accept the response in JSON format (using the "Accept" header).
Example Response:
 HTTP/1.1 200 OK
 Content-Type: application/json

 {
   "user_id": "123",
   "name": "John Doe",
   "email": "john.doe@example.com",
   "age": 30,
   "is_active": true
 }
In the response, the server provides the representation of the requested user in JSON format. The JSON object contains various attributes representing the user's data, such as their user ID, name, email, age, and whether the user is active or not.
The representation of the resource (in this case, the user) is a structured data format that both the client and server understand. JSON is a popular representation format due to its simplicity, readability, and compatibility with many programming languages.
🧩 Integrating Lambda with API Gateway
Integrating Lambda with API Gateway means configuring API Gateway to directly invoke a Lambda function when an API endpoint is called. This is a popular way to build serverless APIs. The integration can be set up using the AWS Management Console, AWS CLI, or AWS CloudFormation.
In this section, we are going to configure REST API with API Gateway.
Step 1: Create a Lambda Function
Go to the AWS Management Console:
Open your web browser and go to the AWS Management Console (aws.amazon.com).
Log in with your AWS account credentials.
Navigate to the Lambda Service:
Once logged in, you will be on the AWS Management Console homepage.
Type "Lambda" in the search bar.
Click on "Create function":
- In the Lambda service dashboard, click on the orange "Create function" button to start creating your new Lambda function.
Configure your function details:
On the "Create function" page, you need to provide some basic details for your function:
Name: Enter a unique name for your Lambda function.
Runtime: Select the programming language you want to use for your function (e.g., Python, Node.js, Java, etc.).
Role: Choose Create a new role with the required permissions.
Click on Create function.
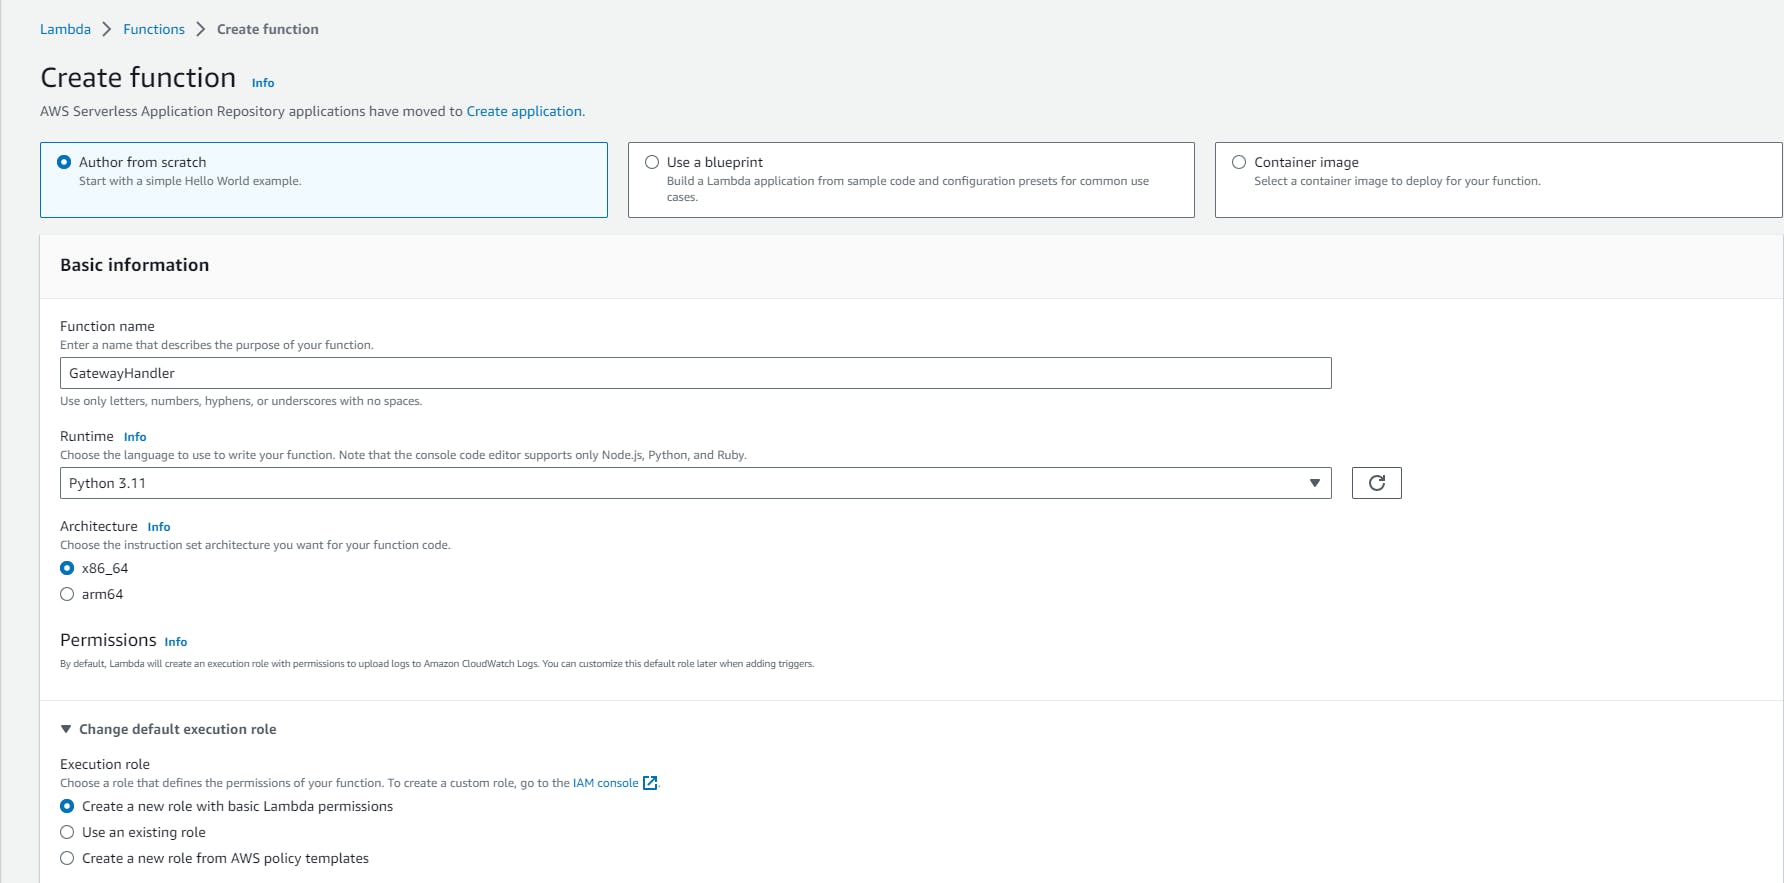
Paste the following code in your Lambda function:
 def lambda_handler(event, context):
     # Your logic here
     return {
         "statusCode": 200,
         "body": "Hello, this is a simple Lambda function!"
     }
Step 2: Deploy the Lambda Function
After writing and testing your Lambda function, click the "Deploy" button in the AWS Lambda console. This will make your Lambda function available for integration with API Gateway.
Step 3: Create an API in API Gateway
Navigate to the API Gateway Service:
- Type "API Gateway" in the search bar
Click on "Create API":
In the API Gateway service dashboard, click on the orange "Create API" button to start creating a new API.

Choose the type of API:
API Gateway offers two types of APIs: "REST API" and "WebSocket API."
Select "REST API" to create a traditional HTTP-based API with methods like GET, POST, PUT, DELETE, etc.

Configure your API details:
On the "Create API" page, you need to provide some basic details for your API:
API name: Enter a name for your API.
Description (optional)
Endpoint Type: For most cases, "Regional" is a good choice.
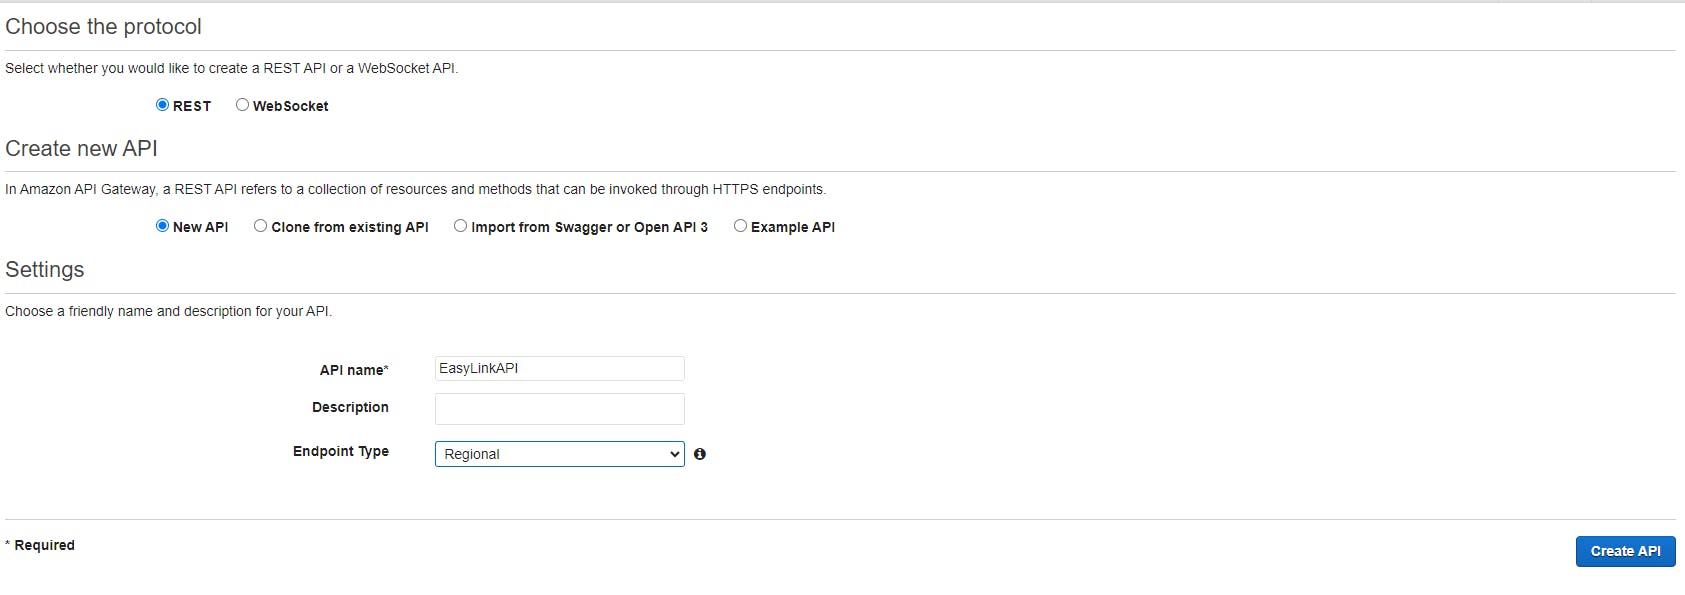
Click on "Create API":
- After providing the necessary details, click on the "Create API" button at the bottom of the page to create your API.
Step 4: Create a Resource and Method
Create a Resource:
A resource represents a path or endpoint in your API's URL structure.
Click on "Create Resource" under your selected API.
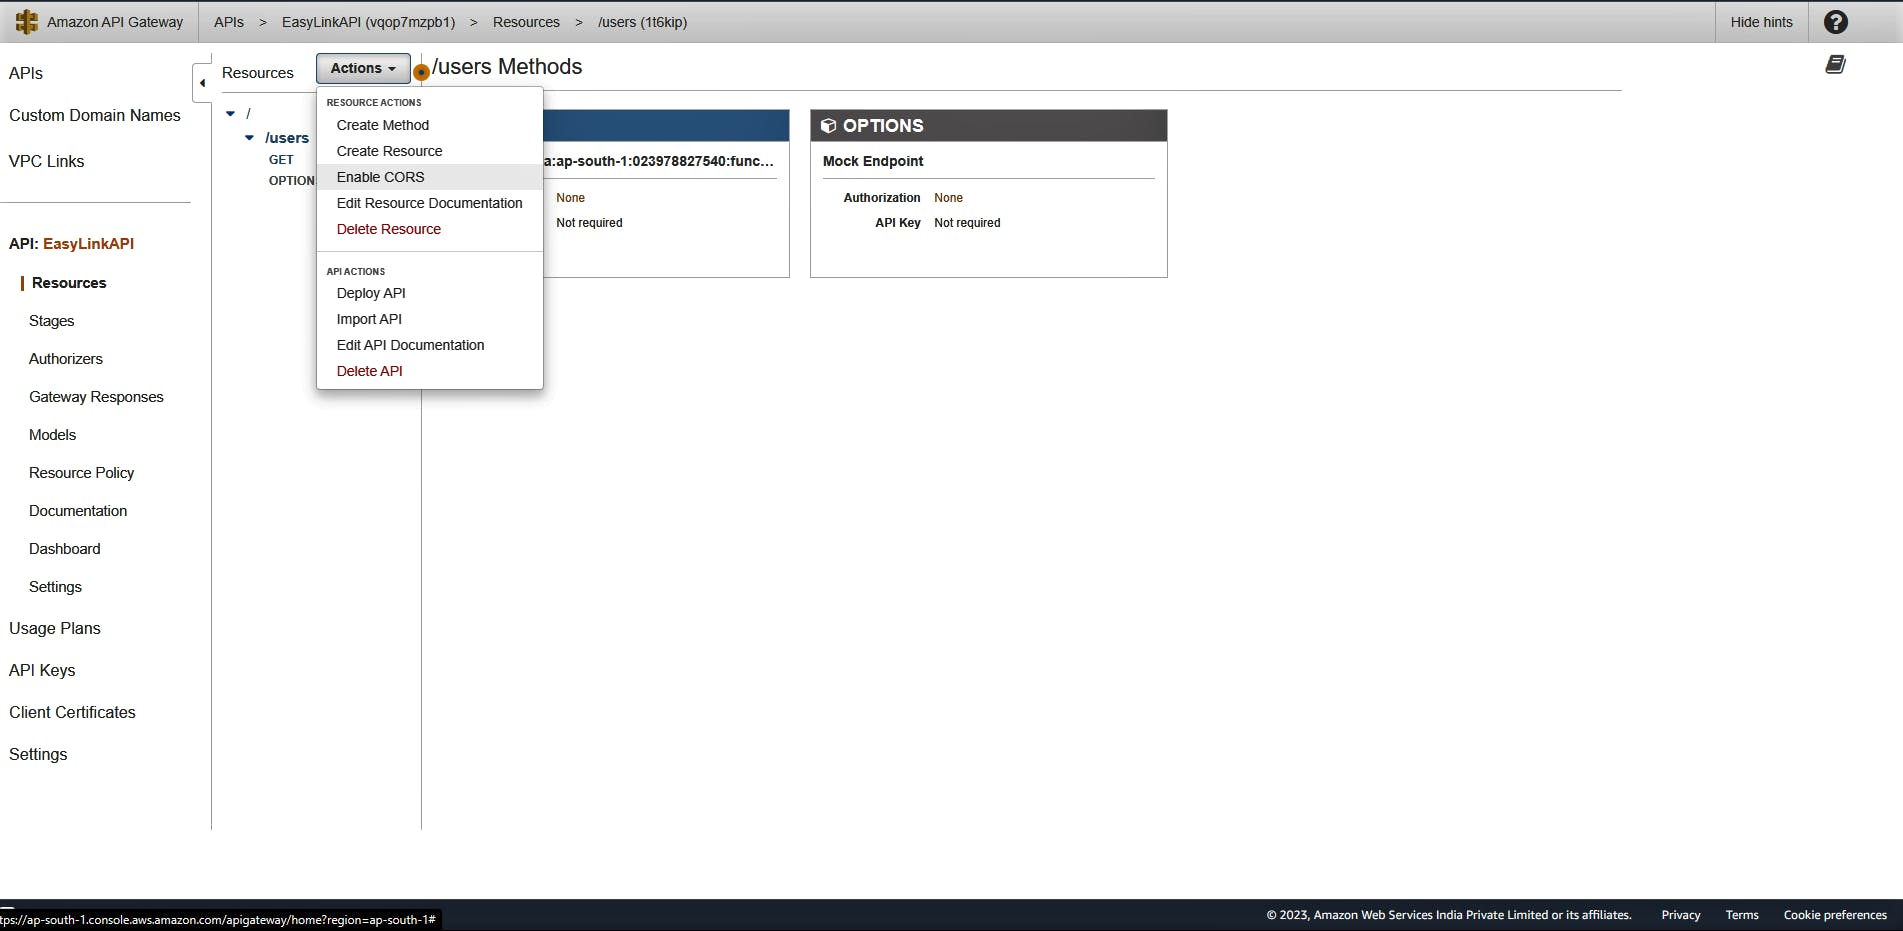
Enable cors
Enter a resource name and path (e.g.,
/users)for the new resource, and click "Create Resource."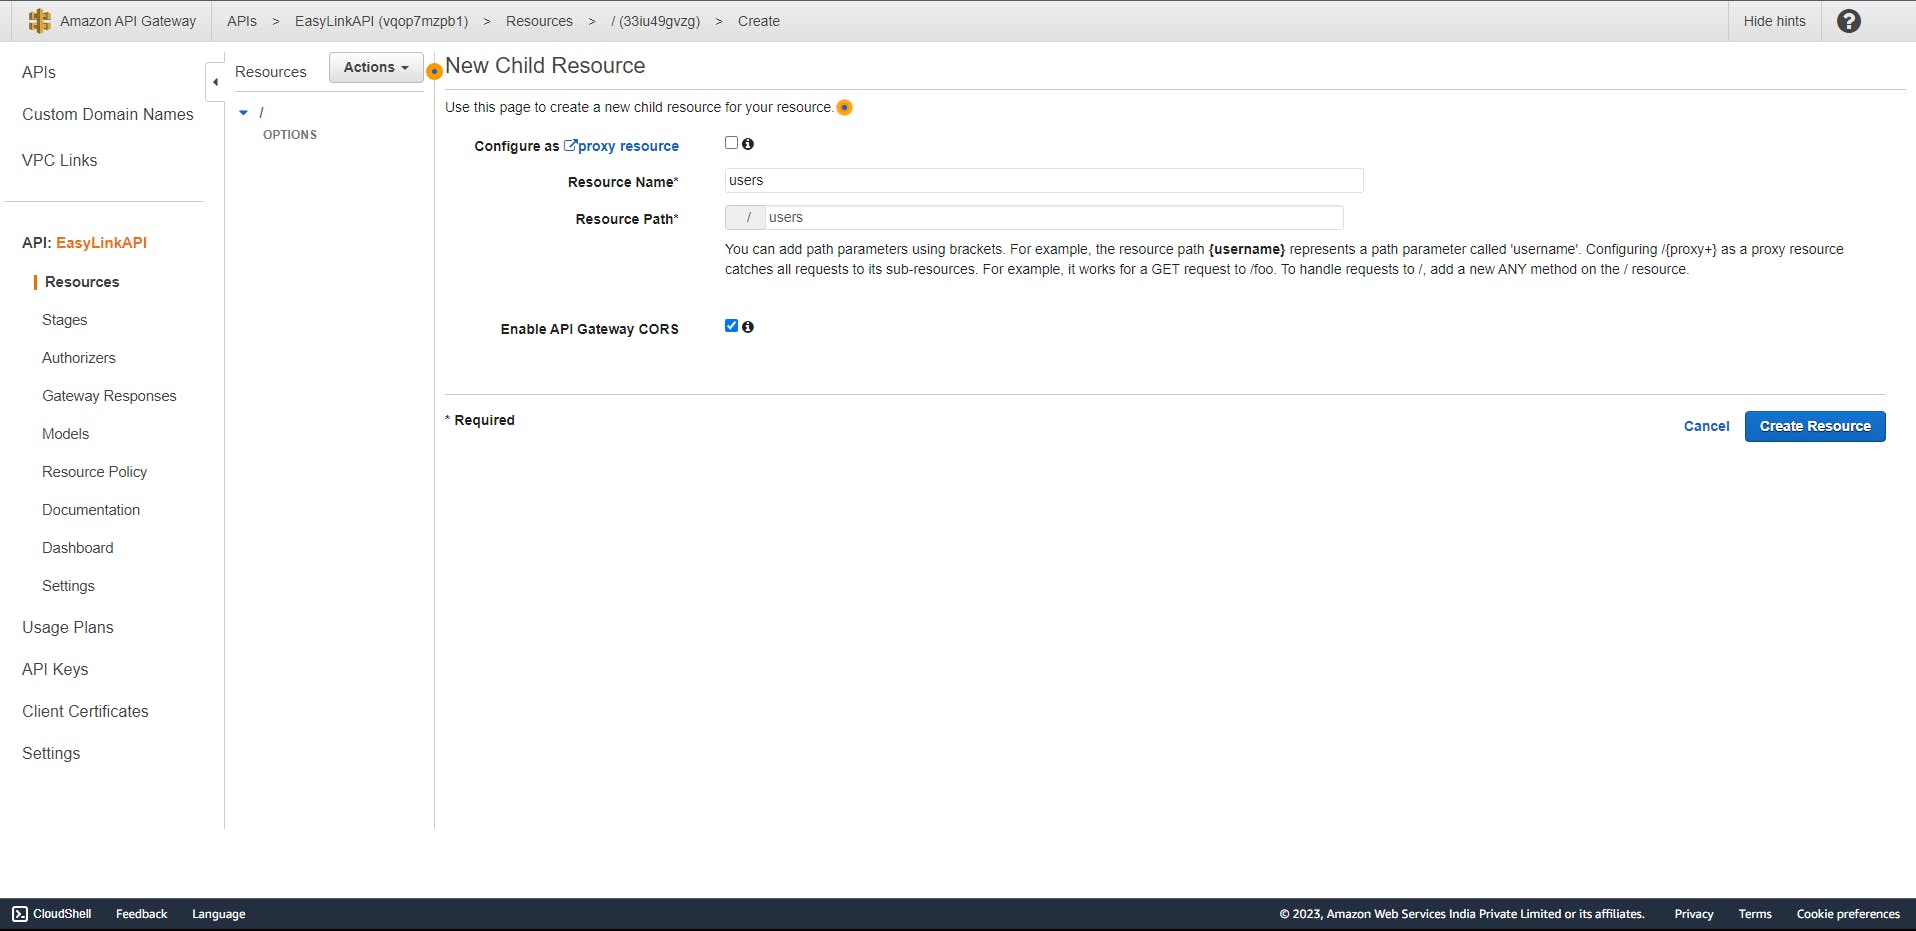
Create a Method:
With the newly created resource selected, click on "Create Method" from the "Actions" dropdown menu.
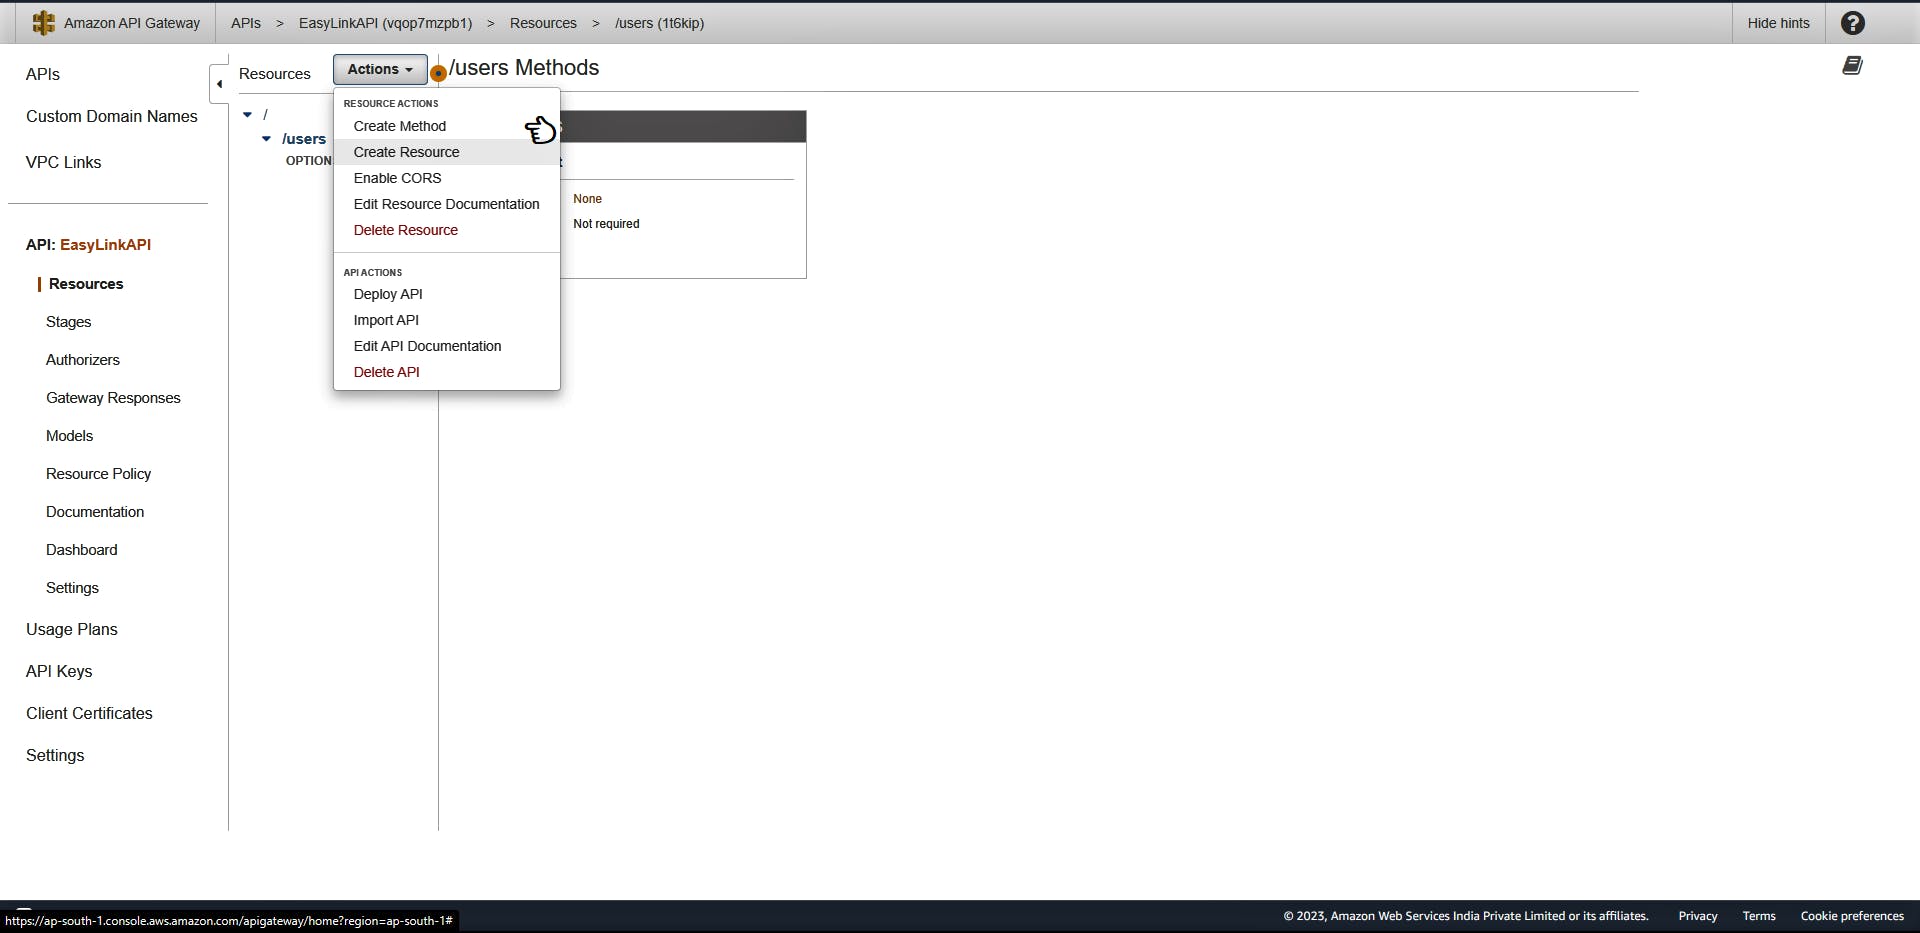
Choose the HTTP method GET to associate with this resource
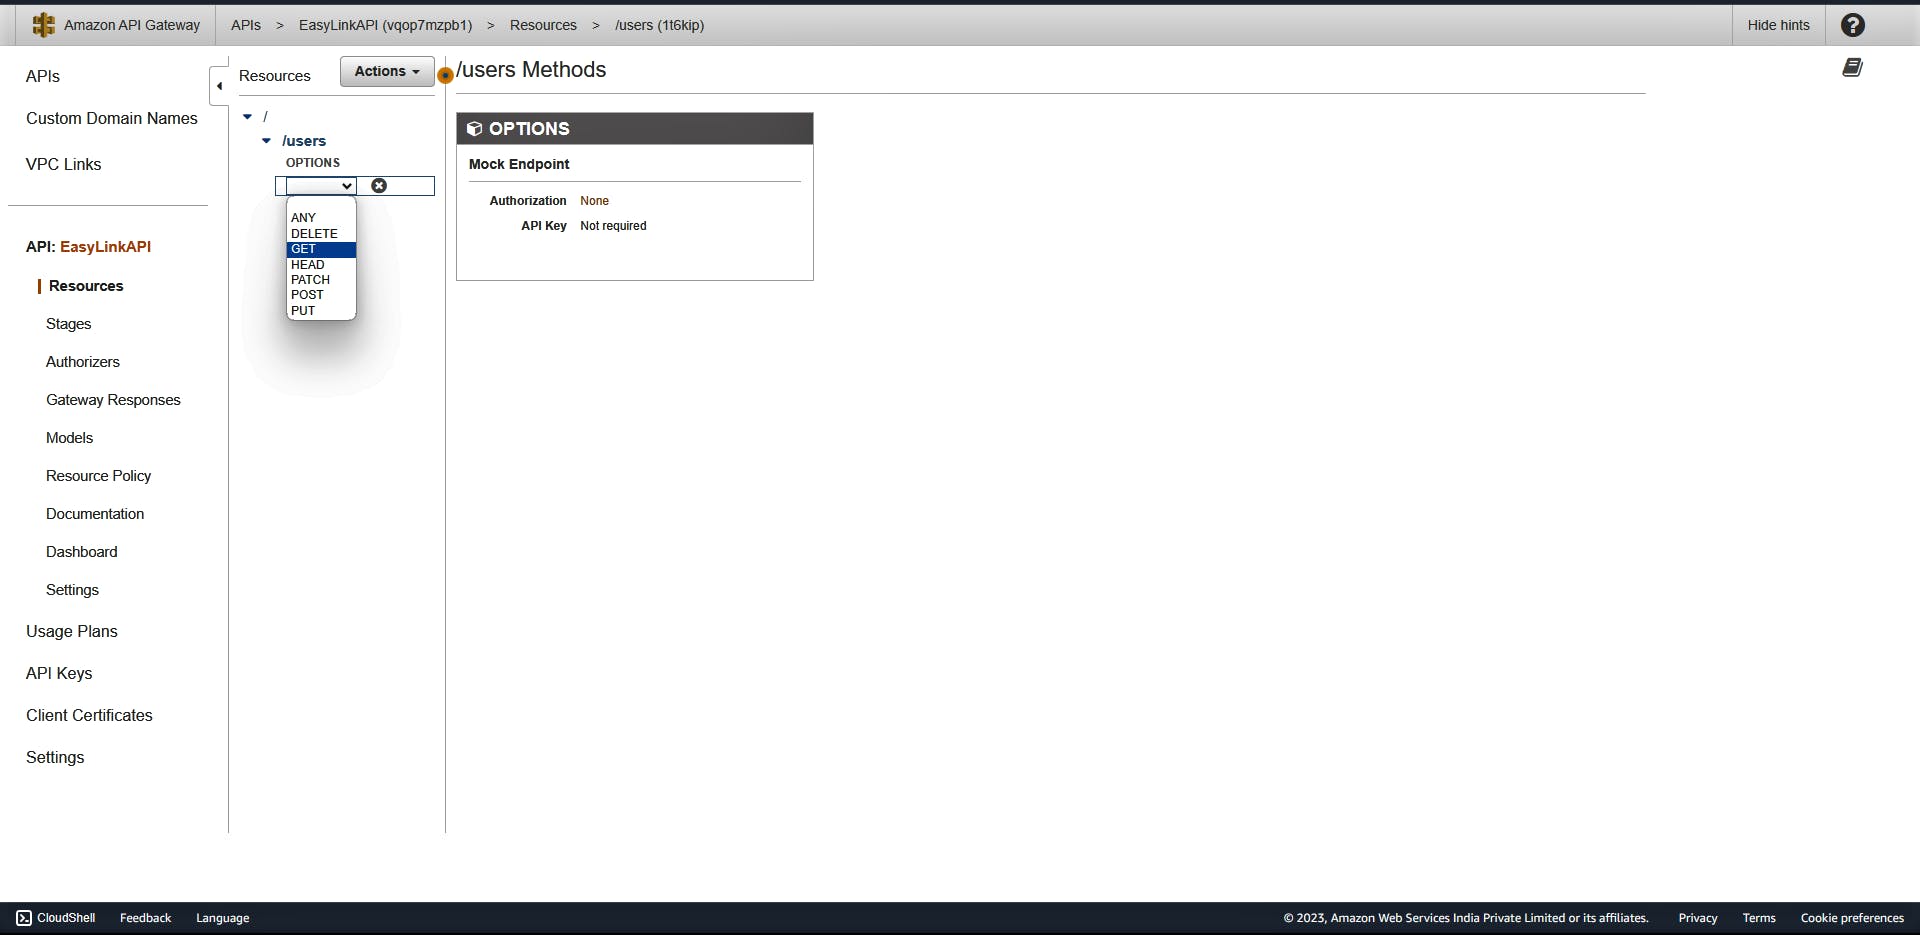
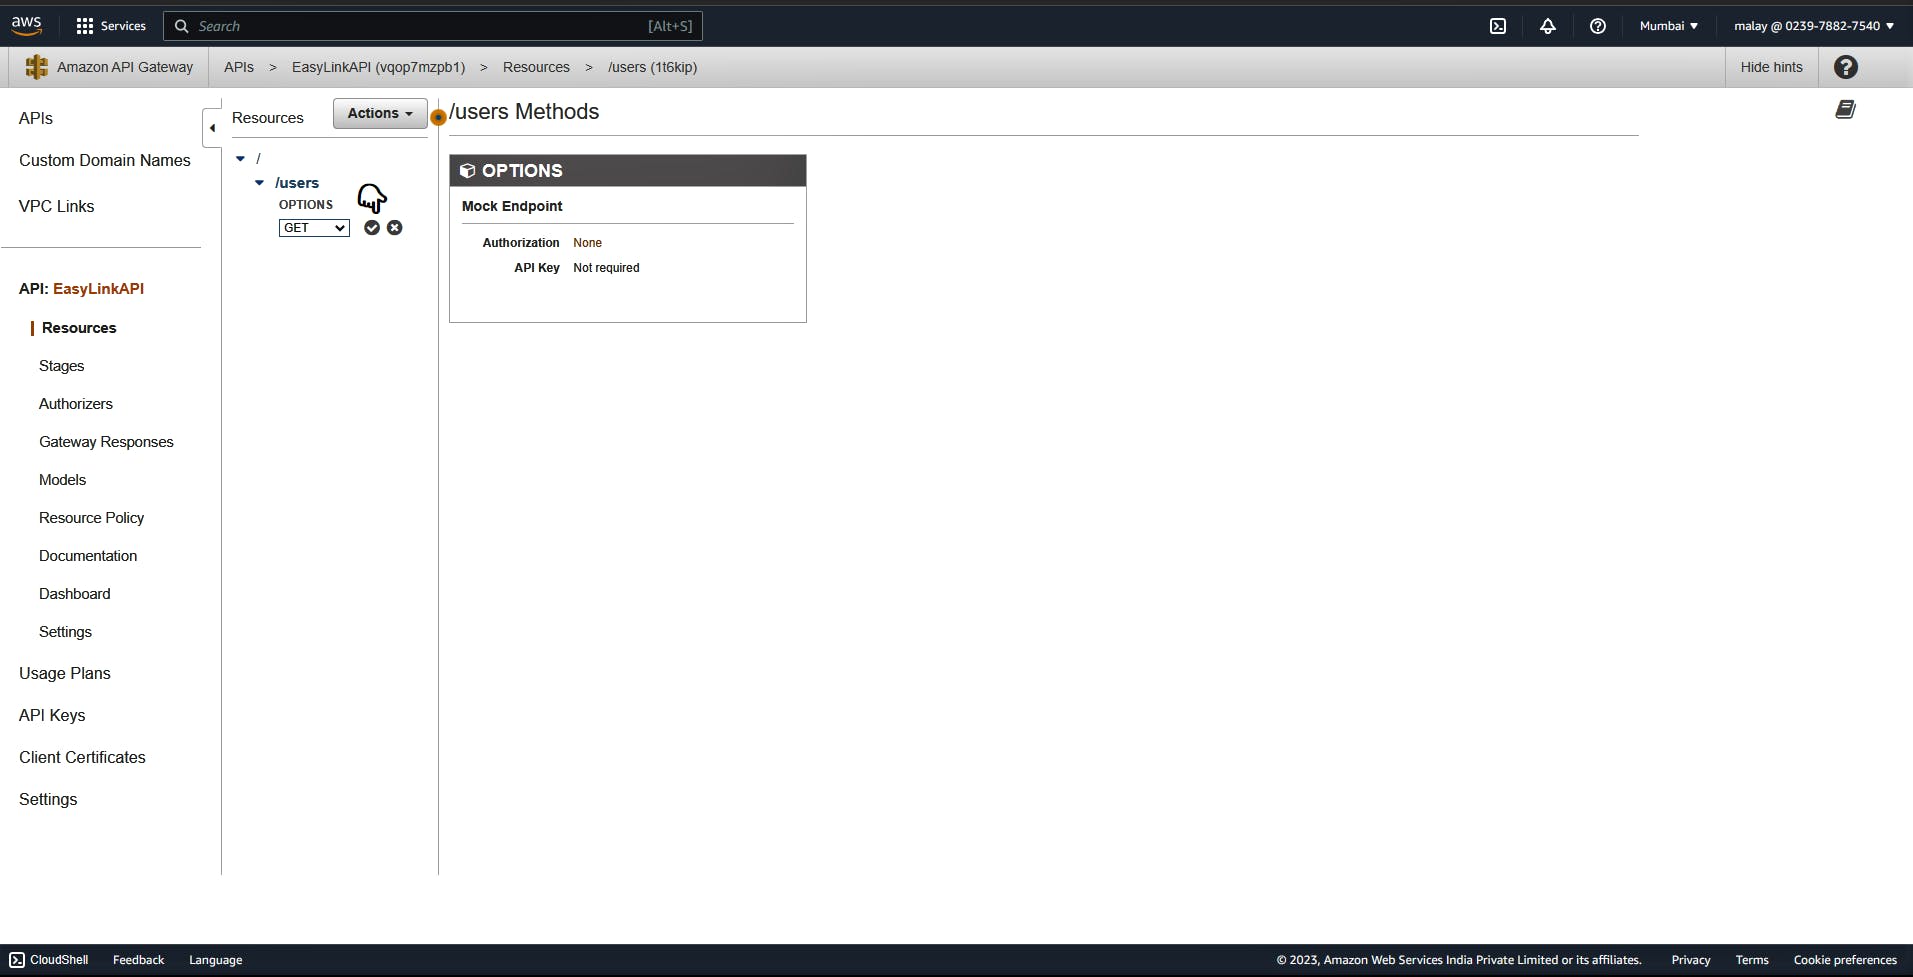
Configure the Integration:
Choose the Lambda function you want to associate with this method. This function will be invoked when the method is called.
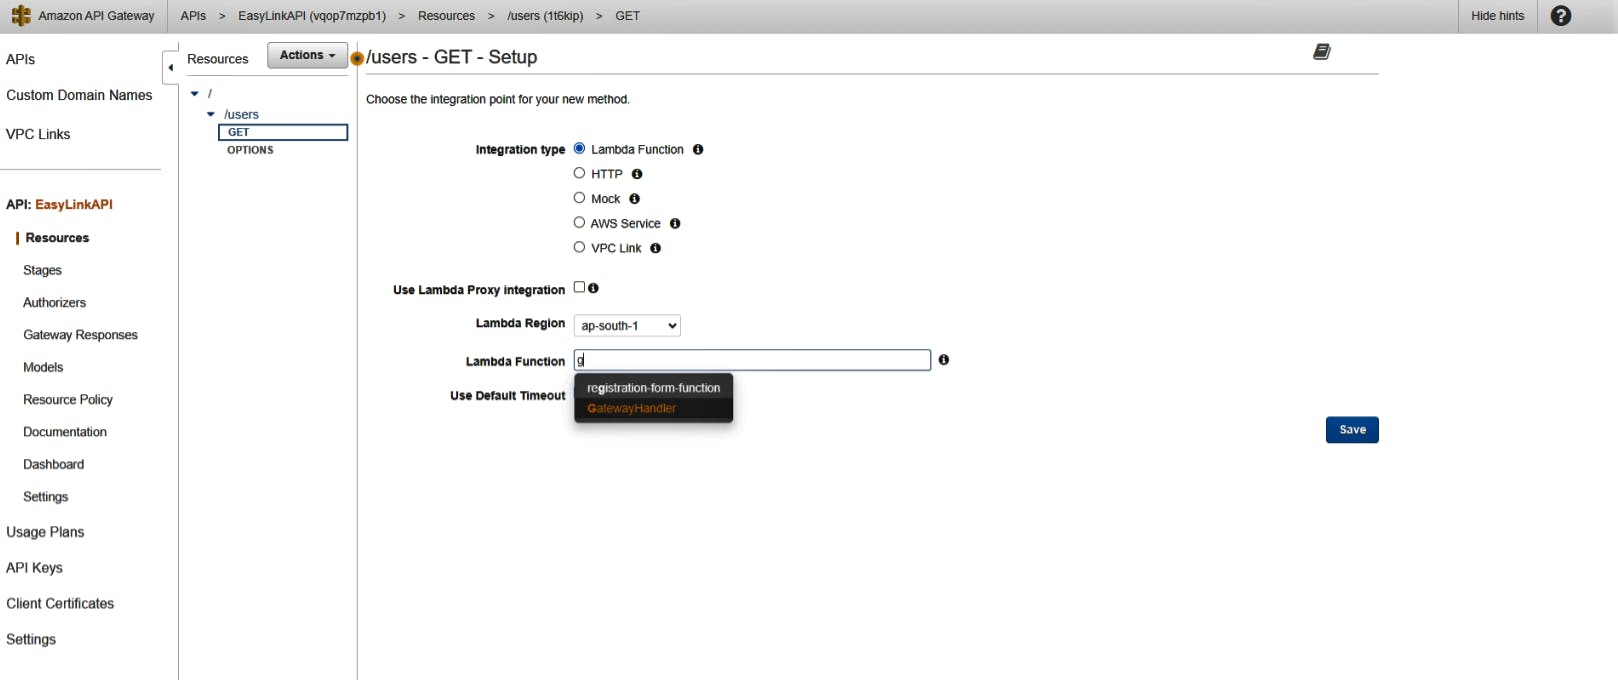
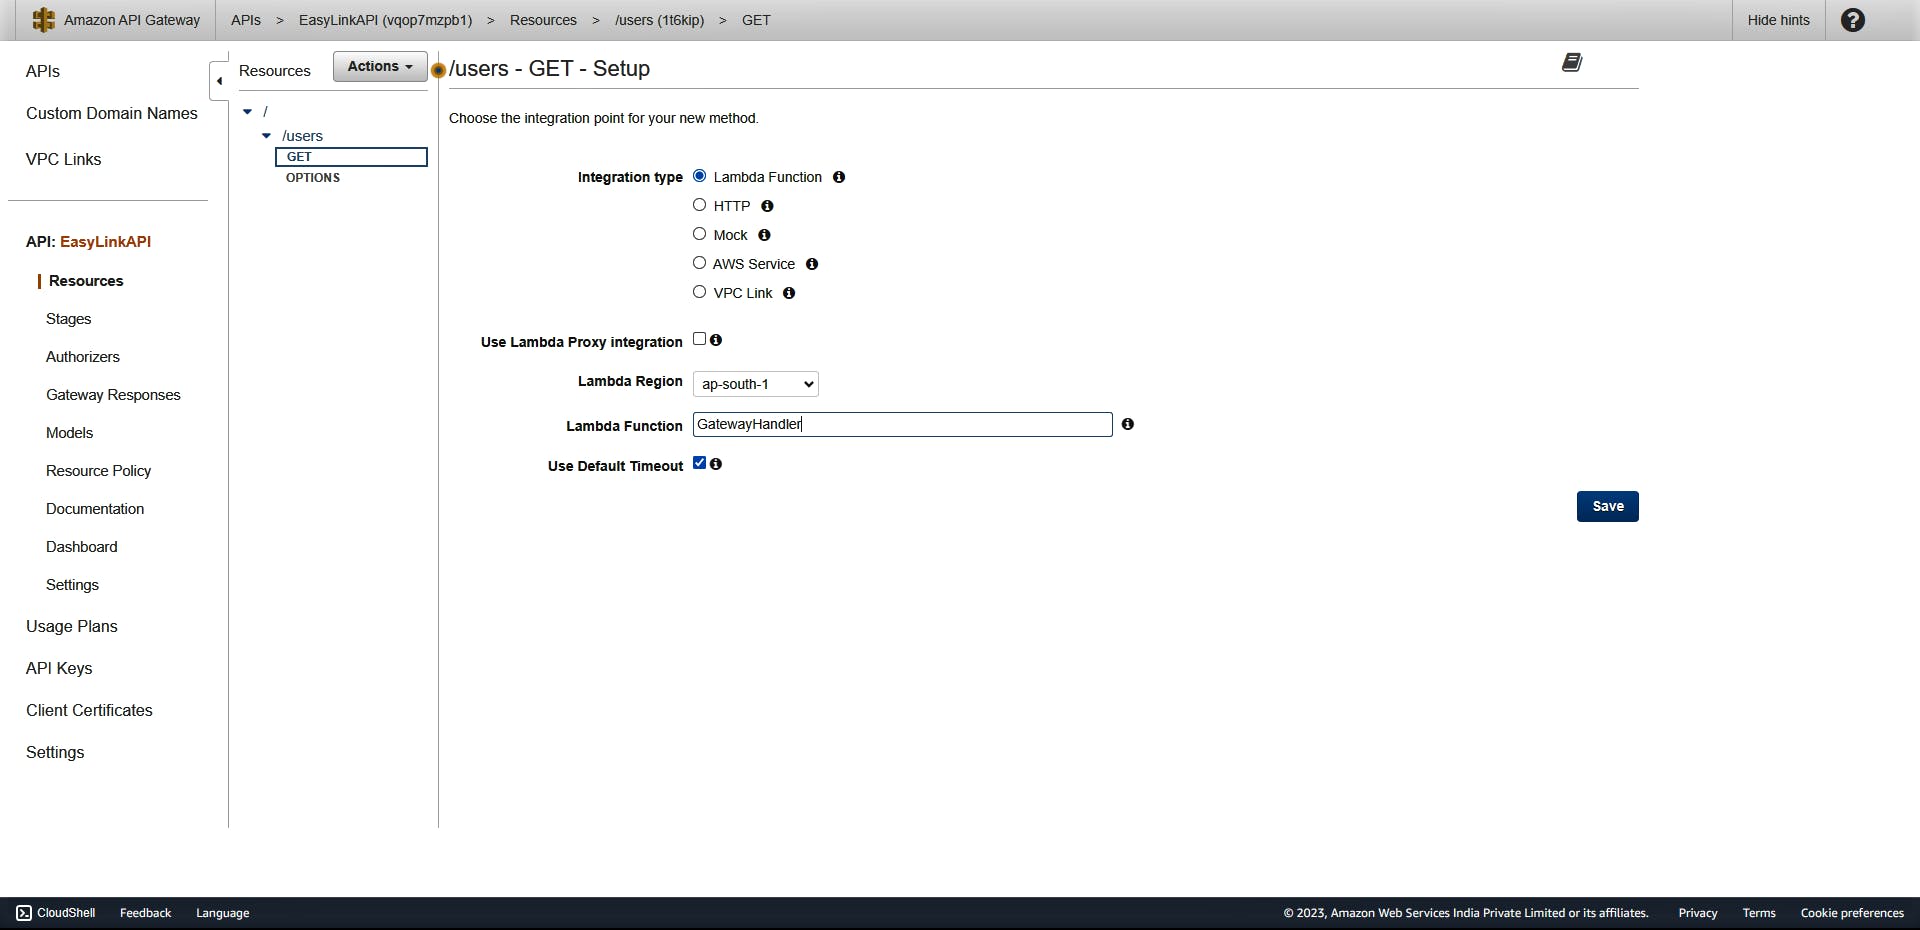
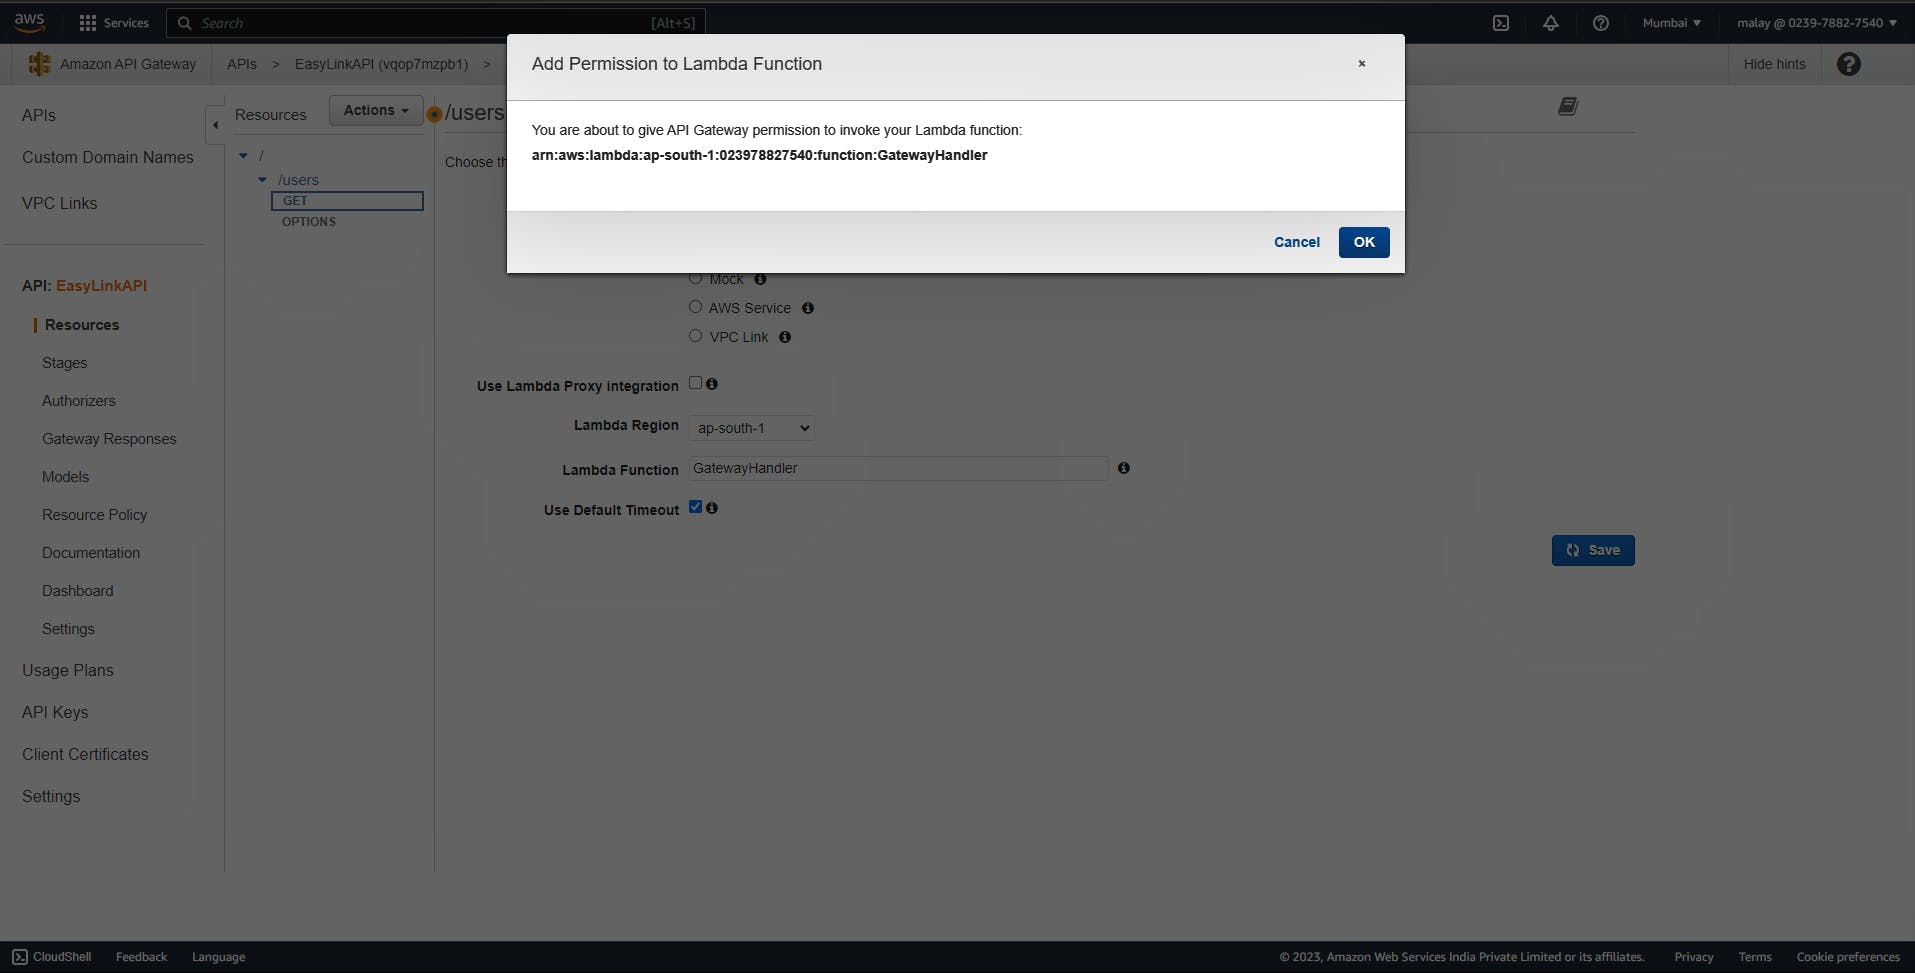
Click on "Save".
Click on "OK" on a new prompt appeared.
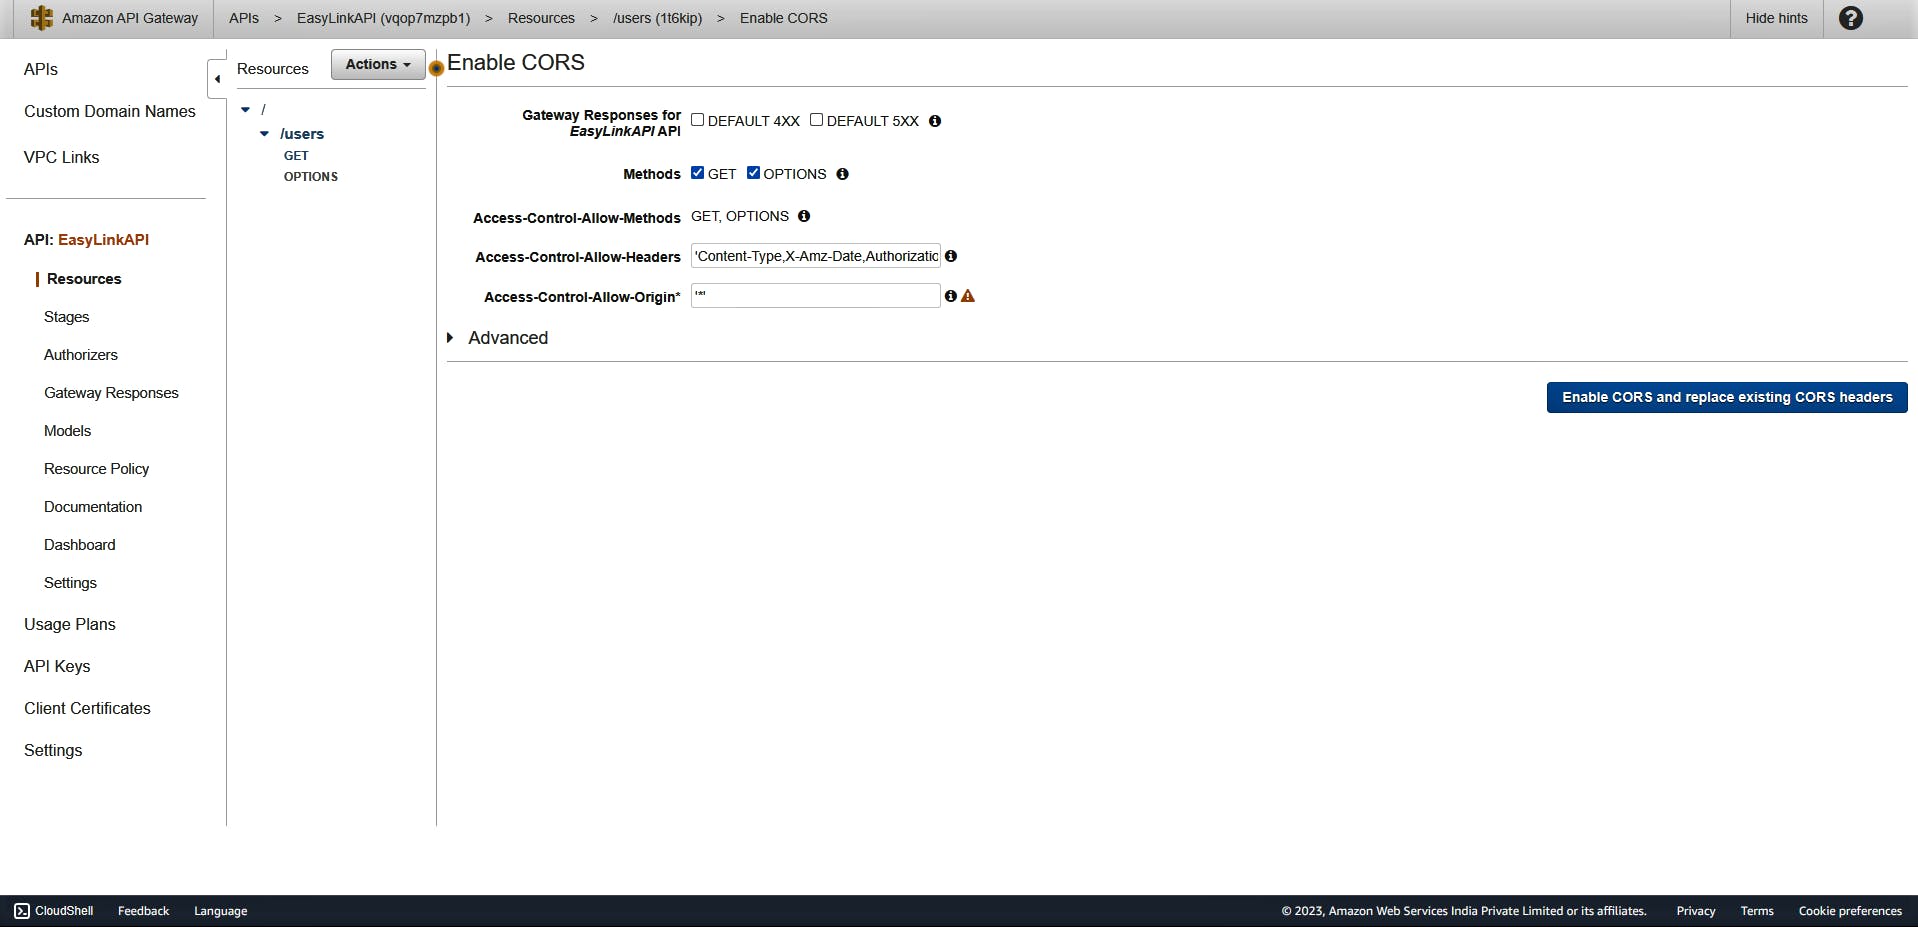
Enable CORS:

Step 5: Deploy your API:
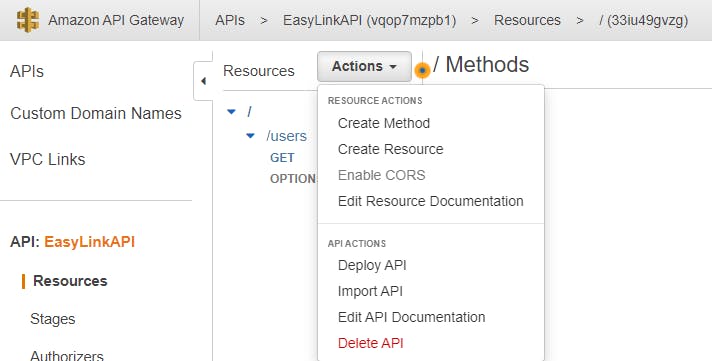
Click on the "Actions" button, and choose "Deploy API."
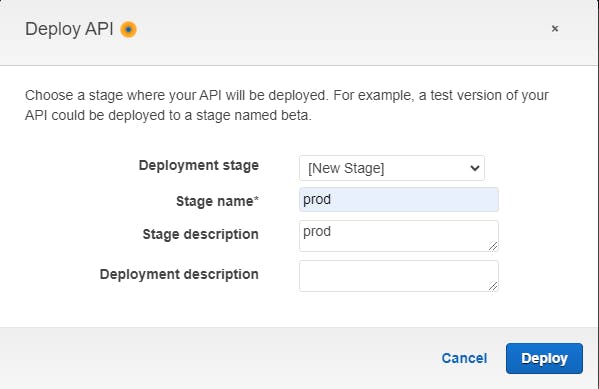
Select the deployment stage (e.g., "prod" for production), and click "Deploy."
Step 6: Test Your API
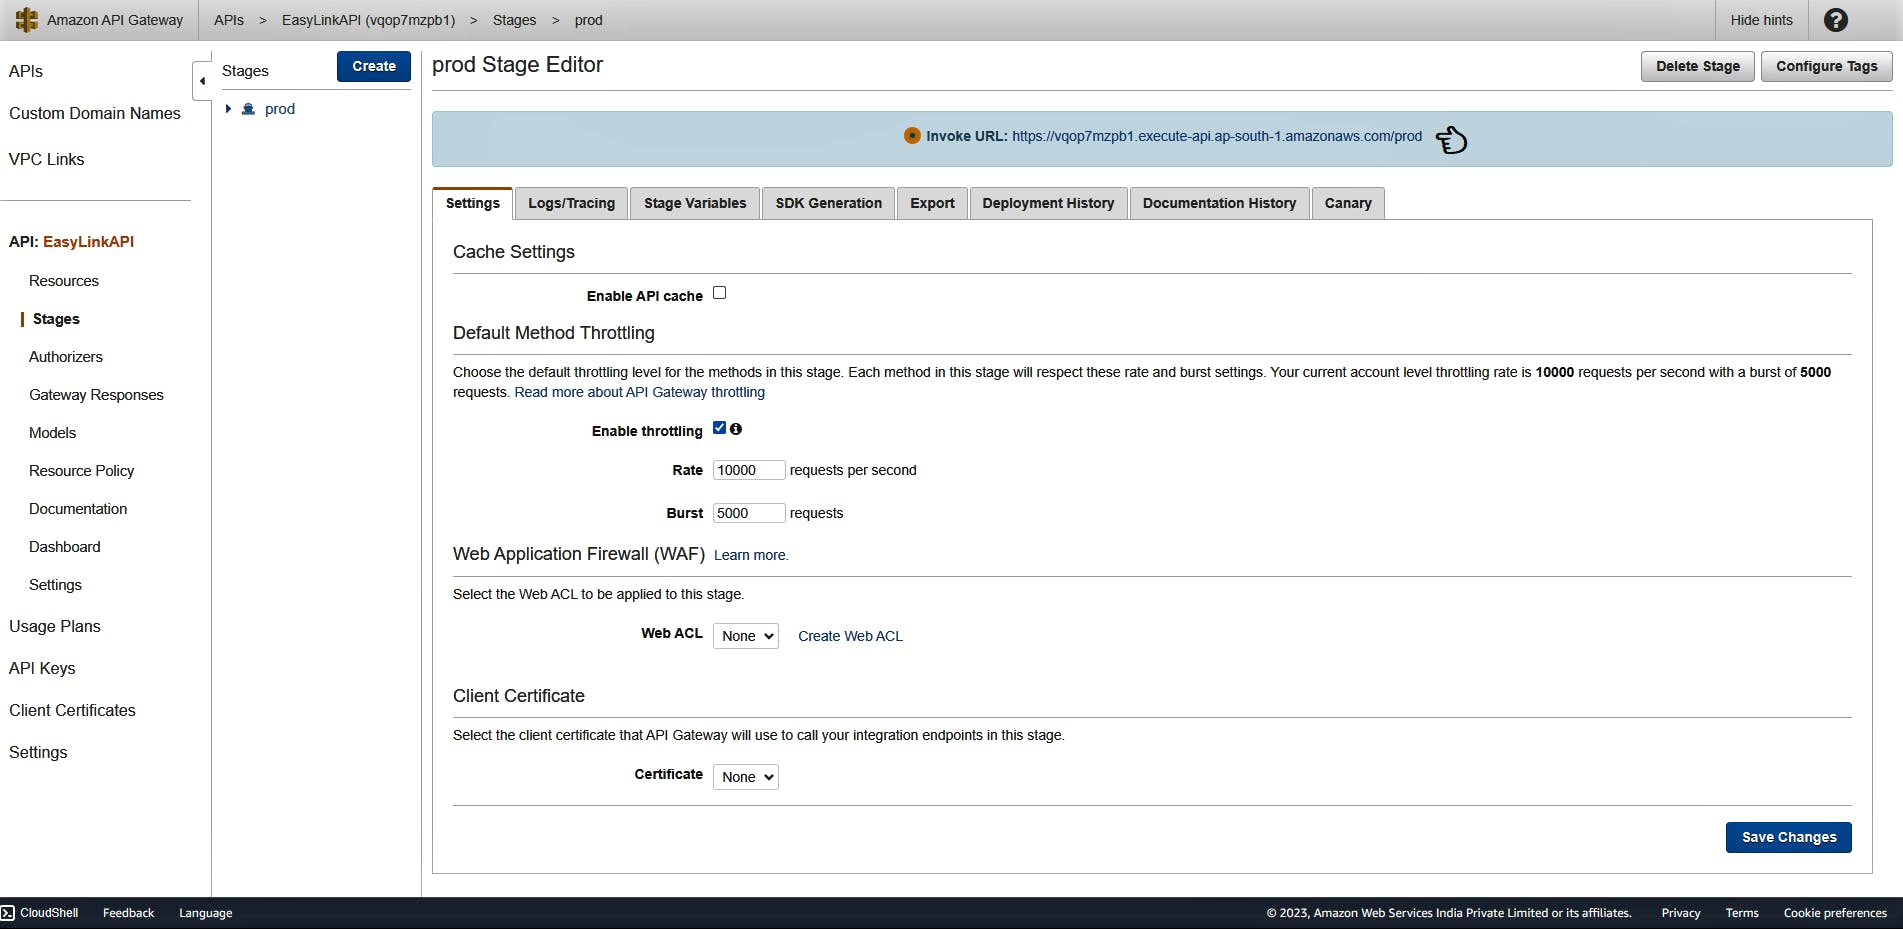
Locate the API endpoint URL:
Use a testing tool:
curl -X GET "https://vqop7mzpb1.execute-api.ap-south-1.amazonaws.com/prod/users"
🌟 Conclusion
In conclusion, the combination of integrating Amazon S3 with AWS Lambda and integrating Lambda with API Gateway empowers developers to build serverless applications that are event-driven, scalable, and cost-effective. Leveraging these integrations, developers can focus on writing business logic while AWS takes care of the infrastructure, making serverless development accessible to a broader audience. As the serverless paradigm continues to evolve, these integrations will remain pivotal in shaping the future of cloud-native application development.